How to read a pattern

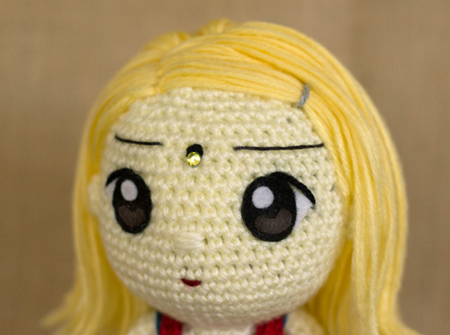
I had several messages from people who would like to crochet amigurumi items based on patterns but still have difficulty understanding the technical terms and abbreviations. I have been there, my first project was a little bear which ended looking like a voodoo doll because I had no clue what I was doing. The instructions looked like special codes and cipher from some James Bond flick and I wasn’t about to save the world with my crochet hook. I was very discouraged and for a while, I stopped trying. I learned, eventually, but it took me a lot of efforts to get started.

I am going to base these instructions on the way I write my own patterns, starting with the abbreviations. Patterns start with the list of materials you will need, and in most cases the type of crochet stitches you are going to use. Here a the basic ones:

rnd: round
sc = single crochet
dc = double crochet
hdc = half double crochet
st = stitch
sl st = slip stitch
ch = chain
inc = increase
dec = decrease
beg = beginning
blo = back loop only
flo = front loop only

Most amigurumi start with a magic ring, so in most cases, you will be asked to make one. Here is a very good video by June Gilbank that shows you how to make one and its purpose:

Now that you know what a magic ring is made, here is a sample from one of my pattern to make a ball:

Make a magic ring,
Rnd 1: 6 sc in center of the ring (6)
You make 6 single crochet in the ring you just made (this step is explained in the video). The (6) is the number of stitches you end up with when you finish the round.

Rnd 2: 2 sc in each st around (12)
You make 2 single crochet in every 6 stitches of the last round. At the end of this row, you should have 12 stitches.

Rnd 3: [1 sc, inc] 6 times (18)
This is what the instructions would be without abbreviations:
“1 single crochet, increase – 1 single crochet, increase –  1 single crochet, increase – 1 single crochet, increase – 1 single crochet, increase – 1 single crochet, increase.”
You repeated the process of one single crochet and one increase 6 times. Once you finish this round you end up with 18 stitches

Rnd 4: [2 sc, inc] 6 times (24) 
“1 single crochet, 1 single crochet, increase – 1 single crochet, 1 single crochet, increase – 1 single crochet,  1 single crochet, increase – 1 single crochet, 1 single crochet, increase – 1 single crochet, 1 single crochet, increase – 1 single crochet, 1 single crochet, increase “
Similar to the previous round but you make 2 single crochet and one increase 6 times. Once you finish this round you end up with 24 stitches.

Rnd 5 to 9: sc in each st around (24)
For the next 5 rounds, you will just single crochet in each stitch. You will end up with the same number of stitches at the end.

Rnd 10: [2 sc, dec] 6 times (18) 
This is what the instructions would be without abbreviations:
“1 single crochet, 1 single crochet, decrease – 1 single crochet, 1 single crochet, decrease – 1 single crochet,  1 single crochet, decrease – 1 single crochet, 1 single crochet, decrease – 1 single crochet, 1 single crochet, decrease – 1 single crochet, 1 single crochet, decrease.”
On this round, you made 2 single crochet and one decrease 6 times. You end up with 18 stitches at the end of your row.

Rnd 11: [1 sc, dec] 6 times (12)
“1 single crochet, decrease – 1 single crochet, decrease – 1 single crochet, decrease – 1 single crochet, decrease – 1 single crochet, decrease – 1 single crochet, decrease.”
On this round, you made 1 single crochet and one decrease 6 times. You end up with 18 stitches at the end of your row.

Rnd 12: dec 6 times (6)
Fasten off.
You decrease 6 times and end up with 6 stitches at the end of this round.
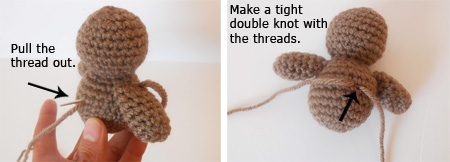
Cut your yarn and pull it with your hook.

Now that your ball is finished and stuffed with fiberfill, how do you close it? You still have 6 stitches left. In order to do that you will use your remaining thread and a needle. Insert your needle and thread in the front loop of each stitch of the last row and pull your string, this process with close the hole. You can hide the rest of the thread by weaving it between stitches of the ball.

Starting your round with a chain instead of a magic ring
There are cases where a pattern will ask you to start with a chain to start your first round, here is an example:
5 in ch,
Rnd 1: sc in second ch from hook, 2 sc, inc, turn, 2 sc, inc (9)
This is what the instructions would be without abbreviations:
Make 5 stitches to make a chain,
“single crochet in the second chain from the hook, single crochet, single crochet, increase, turn to the other side of the chain, single crochet, single crochet, increase.”
This one sounds a little bit more complex so I added a visual to understand the process:

Tail-3.jpg

I hope this helps a little, not everybody writes patterns the same way so I don’t expect to have solved all the difficulties one might run into while reading a pattern. But if you have any questions, or things you would like me to add to this post let me know in the comments.

Happy crocheting!

How to make eyes with felt

My previous post was about a Chibi doll I made that required large manga eyes. It was my first time trying that style, and since I had to figure out how to make them I thought it would be nice to share a tutorial to show you how I did it. It turned out to be very simple!

gweneyes

Before starting on the eyes, I spent some time browsing through images of manga eyes to find a design I liked that would be easy to replicate with felt.  My doll had black eyes so I used felt in the following colors: black, dark brown, and white. I also used scraps of black yarn to embroider the top edges. If your doll has blue eyes, use the blue instead of dark brown.

You will need really good scissors to cut the felt, preferably small ones to cut the small pieces. I bought two pairs at the craft store, one large and one small, and they come very handy!

img_7013

  • Cut two ovals shapes with black felt, the size will depend on the head. You can start with large ovals and cut them down until you are happy with the size. Mine were about 1.5 inches because the head of my doll was quite large.
  • Next you will cut two small circles using white felt, and two rounded croissant shapes with brown felt.
  • Finally, cut two triangles with your white felt for the corner of the eyes. Curve them at the bottom to fit the shape of the side of your eyes.

IMG_7019.jpg

Glue the pieces together (except for the white triangles). Glue  your eyes to the head, then glue the triangles on each side of the eyes (I used a glue gun, it holds the pieces really well together).

With a long strand of black yarn, embroider from top to side on each eyes just once.

img_6996

That is it! You can even glue some eyelashes to make her look even cuter. I hope you enjoyed this little tutorial, and if you have any questions don’t hesitate to ask me in the comments.

Happy crocheting!!!

Two ways to crochet doll feet

Today I am posting a tutorial to crochet doll feet. Not just one tutorial, but two of them because there is more than one way to make them. One is very simple and starts with a basic round, the other one uses a chain.

IMG_5765
Two different methods to make a foot.

I personally like the shoe shape foot, even though the other one is easier to make. If you are a beginner I would recommend to start with the first tutorial.

IMG_5764

You can decide which one you like best for your projects, or use both depending on the doll you are working on. Once you understand the concept, you can modify the tutorial to make feet larger or smaller.

IMG_5766
On the left, the foot is crocheted with a chain at the beginning. On the right, it is crocheted in rounds with a magic ring.

Abbreviations used for both tutorials:
rnd = round
sc = single crochet
inc = increase
dec = decrease
ch = chain
st = stitch
BLO = back loop only

ROUNDED FOOT:

The foot is crocheted in continuous spirals without joining the rounds.

With yarn, and crochet hook of your choice (I use a 2.75mm hook):
Start with a magic ring, or crochet 2 stitches in a chain and work your first round in the second stitch:
Rnd 1: 6 sc in center of the ring if using a magic ring, or 6 sc in second st from hook if using a chain (6)
Rnd 2: 2 sc in each st around (12)
Rnd 3: [1 sc, inc] 6 times (18)
Rnd 4: sc in each st around (18)
Rnd 5: dec 3 times, 12 sc (15)
Rnd 6: dec 2 times, 11 sc (13)
Rnd 7: dec 2 times, 9 sc (11)
Rnd 8: sc in each st around (11)
Stuff your foot with fiberfill.
Now you can continue with rounds of sc to make the legs!

In this second tutorial, the shape of the foot is more defined as a shoe. You will start with a chain, but you will still work in rounds without joining the rounds.

SHOE SHAPE FOOT:
Rnd 1: ch 6, 4 sc, 3 sc in next st, continue on
the opposite side of the chain, 3 sc, 2 sc in
last st (12 sc)
Rnd 2: 2 sc in first st, 3 sc, 2 sc in next 3 st, 4
sc, 2 sc in last st (17)
Rnd 3: (2 sc, inc) 5 times, 2 sc (22)
Rnd 4: sc in each st around BLO (22)
Rnd 5: 8 sc, dec 4 times, 6 sc (18)
Rnd 6: 7 sc, dec 3 times, 5 sc (15)
Rnd 7: 7 sc, dec 2 times, 4 sc (13)
Rnd 8: 7 sc, dec 2 times, 2 sc (11)
Rnd 9: sc in each st around (11)
Now you can continue with rounds of sc to make the legs!

Tip: If you want to make a sole for your foot, just change colors at round 4. You don’t have to work round 4 in back loop only if you don’t want to. You can just crochet both stitches if you don’t want a sole.

IMG_5770
Foot without back stitches.

I hope you find these tutorials useful, and if you have any questions don’t hesitate to ask me in the comments.

Happy crocheting!

How to change color seamlessly

When you change colors while working in rounds you usually end up with a zig zag pattern that doesn’t look very nice if you really care about details. That’s the downside of working in spirals, your row is not leveled with the previous one, and any change of color will show. There is another way to make your rows look seamless, and it is actually very easy to do.

Here are two pieces I crocheted, one was done the basic way, the other one is seamless. The one on the right looks much better, obviously, so here is a tutorial to show you how to do it.

Let, basic color change. RIght, seamless color change.
Let, basic color change. Right, seamless color change.

When you are ready to change color, just finish your row and fasten off (do not make a slip stitch). You will start your next row 3 stitches back from the previous row.
color change step 1

Make a slip stitch with your new color, then a single crochet in the same stitch. You can start hiding the  loose threads behind your stitches as you go.

color change step 2

color change step 3

color change step 4

Continue to single crochet in rounds as usual until you are ready to change color again. Fasten off and repeat the same process from the beginning with the new color.

color change step 5

Color change step 6

color change step 7

That’s it!  As easy as that. If you have any questions about this tutorial don’t hesitate to ask me in the comments section. Happy crocheting!

Tutorial – How to close extremities

Here is a short tutorial to teach you how to embroider the extremity of an amigurumi part. Amigurumis are worked in rounds that you increase then decrease at the end. Usually you end up with a small hole at your last row that you have to embroider to close up if you don’t decrease until your last stich. Here is the best way to do it, it leaves the extremity seamless and neat.

Here I have the body of a piggy I have been working on. I only have one row left to finish it, but if I decrease until I have no longer any stitches left, this is what will happen:

montage1

You will end up with a lump that doesn’t look very nice. Instead of decreasing all the stitches of your last row, just decrease until you have 6 stitches left. fasten off and leave a long tail for sewing.

DSCN8274

With a yarn needle, insert your thread in the front loop of your first stitch, and pull. Do the same with the remaining 5 stitches.

DSCN8276

Now pull your thread until the hole is closed up. All you have to do is hide the remaining thread by weaving it between the rows. This is a very easy method and I think the one that works best.

montage2

DSCN8281I hope you enjoyed this little tutorial, and if you have any questions, don’t hesitate to ask me. Also if there are tutorials that you would like me to post, I welcome any suggestions.

Happy crocheting!

How to change yarn color

When I write amigurumi patterns, I always assume people know how to change color, so I only tell them what row they are supposed to do it, but not how. That inspired me to post this tutorial for crochet beginners who would like to learn how to do it. I hope this tutorial is comprehensive, I put a lot of pictures to help you understand the process.

Assuming that you have to change yarn color for the next row, you will then do it while working on the last stitch of the previous row (amigurumi rounds are worked in spirals). In this case, we are doing it with single crochet stitches.

– Insert your hook in the stitch, wrap your yarn over it, then pull it through both loops of the stitch. You have now 2 loops on your crochet hook.

color tutorial1

– Grab the yarn you want to change color with, fold it into a loop, and wrap it over your hook to draw through the 2 remaining loops in your round.

Color Tutorial 2

– Now you can cut the yarn you won’t be using anymore, but leave a long tail of strand (you are going to hide it within your next crochet stitches).

Color Tutorial 3

– Insert your crochet into the next stitch, and make a single crochet with your yarn over the two loose strands.

Color Tutorial 4

Color Tutorial 5

Color Tutorial 6

– Once your loose strands are secured, just continue working your round normally. Another way would be to embroider the strands with a yarn needle after you finish your round, but I like doing it this way better.

Color Tutorial 7

Voila! I hope you found this tutorial useful, and if you have any questions, don’t hesitate to comment.

Happy crocheting!

The three odd items in my craft box

My craft storage box looks like I have dumped the content of my bathroom in it, and friends often ask me why I have hairspray, makeup, and a pet brush amongst all the other odds things I use for my craft. Well, I do not brush my dog, fix my hair or put on makeup while I crochet, but I use these items often to work on my dolls.

Pet brush, eyeshadow, and hairspray

The pet brush
I use this tool to brush the yarn when I need my plush to look fuzzy and fluffy. It’s better to use a wire brush for a better effect, simply brush the yarn in different directions until you get the effect wanted. Here I used a ball as a dummy to show you the result:

ddd
I added the eyes afterward, a little fuzzy ball dude!

You could use this method to  make a yeti, or a fuzzy spider for example.

Makeup
I buy the makeup at the dollar store. Palette of eyeshadows with a variety of colors, and blush. I mostly use it to make pink cheeks, or to accentuate the eyes. On occasion I put black eyeshadow under the safety eyes to give the amigurumi a dramatic look. Simply tap gently with a small brush on the area you want to cover, and if you feel you have put a bit too much, you can always remove the extra powder by dabbing with a dry piece of tissue or cloth. Here is an example with a white ball dummy:

pink cheeks can really give some life to your amigurumi

You can really play around with a palette, for instance using red or green if you make a zombie.

Hairspray
It’s funny because I never use hairspray on my hair, and my hairdresser always shakes her head when I tell her what I do with the samples she gives me to try at home. I style my dolls *hair to keep them together, or like in the example below, make them stand up. I use a chemical-free organic hairspray, but you can also use eco-friendly spray starch. Just spray generously and style the bundle of yarn in the shape you want it to be, then let it dry:

ggg
Interesting hairstyle, isn’t it?

You can repeat the process if necessary. In this example, I held the hair together for a minute while drying.

Voila! This sums up the purpose of these odd items. Now the question is, what am I going to do with these three stooges?

The dummies, always at your service!

*If you want to learn how to make hair, check out my 4 ways to make doll hair tutorial.

Can you machine wash your amigurumi dolls?

Not long ago a lady asked me if it was possible to machine wash and dry amigurumi dolls. I have never tried to wash in the machine, but I have been told that it is possible if the yarn used is acrylic and not wool. It also depends on the kind of stuffing you use, but regular poly-fil from the craft store should be washable.

Since I have never done it, I am going to put this theory to practice, and sacrifice one of my dolls for this experiment (they could use a bath anyway). I picked my little monkey he’s the stinkiest of all of them, and well.. because he’s a monkey!

amigurumi monkey

The method is to put the plush in a towel, pillow case, or any piece of fabric that can protect the yarn from felting or being exposed, and set the machine to gentle wash, cold. Then you can air dry it, or if you put it in the dryer, again at the lowest setting.

I put the monkey in a piece of fabric that I wrapped with a hair tie.

I made sure to tie the bag really tight, just in case.

Does this look like animal cruelty to you?

Then hop, in the washing machine at cold/gentle settings. I did put a tiny bit of detergent in the machine, just for some extra cleanliness. If my monkey dies, at list he will smell good.

amigurumi washing

Half an hour later, the moment of truth…

Still in one piece!
Still in one piece!

The monkey came out fine, it didn’t shrink, didn’t deform into a strange shape, it is just a little bit damp! I could just let it air dry, but since this is an experiment, I am going to put it back in its bag and  in the dryer, with settings on delicate for 30 minutes.

Sparkly clean!
Still in one piece after putting it in the dryer, and sparkly clean!

So it is safe to say that you can wash your acrylic amigurumi plushes in the washing machine and dryer, as long as the settings are set on cold and gentle wash.

But I am not quite done yet!  I decided to repeat this experiment with a dummy I used for one of my tutorials. This dummy has goggly eyes and hair. I wanted to see if the eyes would stick (they are glued to the face), and if the hair would stay in place.

Everything is still in place after the wash
Everything is still in place after the wash.

No problem here either, now I am really sold. I want to thank my little plush monkey for letting me use it for this experiment, I would have been very sad if anything had happen to it. As for the dummy, well, he’s just a dummy!

I hope your find this post useful! If you have any questions or suggestions for washing, don’t hesitate to comment.

Happy crocheting… and washing!

Amigurumi, how to sew parts together

2014 is just around the corner and I am trying to put my mind back into crochet now that the holidays are almost over. I thought a tutorial would be the best way to return into my daily routine, so today I am posting one about stitching amigurumi pieces together.

For this tutorial, I am using a dummy I made just for the occasion. I crocheted a basic head, body, arms and legs, and left a long tail for sewing.

Leave a long tail for sewing on each of the parts, except for the head
Mr Dummy

Head and body
I will start with the head and body. Insert the thread of the body into a yarn needle, and start weaving the stitches of both parts together all the way around:

amigurumi head and body
Make sure the head and body both have the same numbers of stitches on the last row to sew them evenly.
Insert the needle into both stitches and pull, continue all the way arou nd.
Insert the needle into both stitches and pull, continue all the way around.

Once the hole is closed, insert the needle into the neck and pull it out where the second piece of thread is located. Make a tight double knot, and hide the left over threads into the body:

Make sure you pull out the thread in same hole as the othe
This is a method to secure your work once the sewing is done
Make sure you reinsert the needle into the same stitch you made the knot. When you pull on the
Make sure you reinsert the needle into the same stitch you made the knot when you hide the thread into the body. Cut the remaining thread with scissors

Arms:
Now I will sew the arms to the body. The number of stitches doesn’t matter in this case, just make sure you do not stuff the top of the arms too much:

the stitches of the arms will be sewed together when you start joining it with the body.
Before sewing the arm
Continue to sew until all of the arm is joined to the body
Continue the process until all of the arm is joined to the body

Once you are done sewing, you can insert your needle into the body and pull the yarn out on the other side, or the back:

Do not cut the left over yarn, it will be used to secure the arms together

Now do the same with the second arm. Pull the thread of yarn in the same location as the first one once you are done sewing:

This is the same method I used to secure the body and head together
When you pull the thread, the knot will disappear inside the body

Legs:
Use the same method as the arms, using the stitches at the bottom of the body to sew the legs. Secure the legs together the same way as well:

Sewing the legs on the body

Voila! the dummy with its arms and legs put together. I hope you enjoyed this tutorial, and most importantly, that it make sense! If you have any questions, or if there is anything you do not understand, please do not hesitate to ask me.

I put eyes on him to make him look more..uh... human!
I put eyes on him to make him look more..uh… human!

Note: There is another method to sew the legs on the body, but I will save that tutorial for next time. In the mean time, happy crocheting and happy new year!