
2014 is just around the corner and I am trying to put my mind back into crochet now that the holidays are almost over. I thought a tutorial would be the best way to return into my daily routine, so today I am posting one about stitching amigurumi pieces together.
For this tutorial, I am using a dummy I made just for the occasion. I crocheted a basic head, body, arms and legs, and left a long tail for sewing.

Head and body
I will start with the head and body. Insert the thread of the body into a yarn needle, and start weaving the stitches of both parts together all the way around:


Once the hole is closed, insert the needle into the neck and pull it out where the second piece of thread is located. Make a tight double knot, and hide the left over threads into the body:


Arms:
Now I will sew the arms to the body. The number of stitches doesn’t matter in this case, just make sure you do not stuff the top of the arms too much:


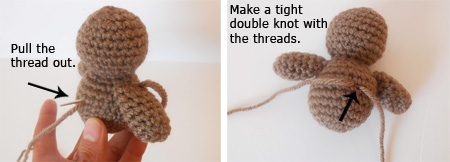
Once you are done sewing, you can insert your needle into the body and pull the yarn out on the other side, or the back:

Now do the same with the second arm. Pull the thread of yarn in the same location as the first one once you are done sewing:

Legs:
Use the same method as the arms, using the stitches at the bottom of the body to sew the legs. Secure the legs together the same way as well:

Voila! the dummy with its arms and legs put together. I hope you enjoyed this tutorial, and most importantly, that it make sense! If you have any questions, or if there is anything you do not understand, please do not hesitate to ask me.

Note: There is another method to sew the legs on the body, but I will save that tutorial for next time. In the mean time, happy crocheting and happy new year!
