A few years ago I posted a free pattern to make a crocheted palm tree, but I removed the link to the PDF file when I found out that the trunk wasn’t as sturdy as I wanted. I did not want people to get upset or be disappointed with the pattern, and since I never found the time to fix the problem I never re-uploaded it.
Since that time I had a lot of request from people to send them the pattern regardless. The demand has been so high that I decided to post it again. Anybody that wants to work with it will be free to do so, just be aware that it isn’t perfect.
Today I am posting a pattern to make a cute little potted plant with yellow flowers. I love plants but I do not have a green thumb, I either forget to water them, or I water them too much. Since I am such a horrible gardener, I turned back to crochet to decorate my house with plants. This is one of the creations I came up with, and I am very excited to share it with you in the hope that you will enjoy it.
To make this tutorial as easy as possible I have included a lot of step by step photos which I hope will be helpful in understanding the process. Have fun, and happy crocheting!
For this crochet project, you will need the following materials:
– 1 medium/4 worsted yarn – brown
– 1 medium/4 worsted yarn – dark brown
– 1 medium/4 worsted yarn – green
– 1 medium/4 worsted yarn – yellow
– 2.75mm crochet hook
– Polyester fiberfill for stuffing
– Thick piece of cardboard
– Stitch marker
– Yarn needle
– Glue gun or fabric glue
Abbreviations:
ch = chain
rnd = round
st = stitch
sc = single crochet
hdc = half double crochet
dc = double crochet
sl st = slip stitch
inc = increase
dec = dec
FLO = front loop only
BLO = back loop only
Note: This amigurumi is crocheted in continuous spirals without joining the rounds. The plant is about 3 in. in width (7.5 cm), and 1.5 in. tall (3.8 cm).
THE PATTERN
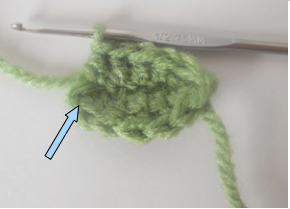
POT: – With brown yarn, start with magic ring
Rnd 1: 5 sc in center of the ring (5)
Rnd 2: 2 sc in each st around (10)
Rnd 3: [1 sc, inc] 5 times (15)
Rnd 4: [2 sc, inc] 5 times (20)
Rnd 5: [3 sc, inc] 5 times (25)
Rnd 6: [4 sc, inc] 5 times (30)
Rnd 7: BLO, sc in each st around (30)
Rnd 8: [5 sc, inc] 5 times (35)
Rnd 9 to 12: sc in each st around (35)
Rnd 13: ch 2, FLO: DC in same stitch, then in each st around (35) – Join the row with a sl st. Fasten off, and weave the remaining thread into the
stitches of the pot.
Row 7 is worked in back loops only.
Row 13 is worked in front loops only.
Join with 3rd stitch from beginning of row.
SOIL: – with brown yarn, make a magic ring
Rnd 1: 5 sc in center of the ring (5)
Rnd 2: 2 sc in each st around (10)
Rnd 3: [1 sc, inc] 5 times (15)
Rnd 4: [2 sc, inc] 5 times (20)
Rnd 5: [3 sc, inc] 5 times (25)
Rnd 6: [4 sc, inc] 5 times (30)
Rnd 7: [5 sc, inc] 5 times (35) Fasten off, leave a long tail for sewing. (Do not sew yet)
Soil part: you will sew it to the pot after you add the leaves.
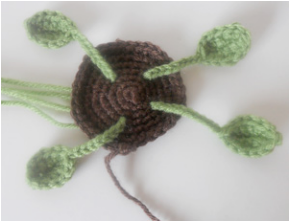
LONG LEAVES (make 4): – With green yarn, ch. 7
Rnd 1: sc in 2nd ch from hook, hdc, 2 dc, hdc, sc, turn, sc, hdc, 2 dc, hdc, sl st to first ch from row, ch. 9. Fasten off, leave a long tail before cutting.
When you turn, you work on the stitches on the other side to finish the row.
When you finish your round, slip stitch with first chain of the row, and make your chain.
SMALL LEAVES (make 4):
Like long leaves but finish with ch.5 instead of 9.
SMALLER LEAVES (make 4):
Like long leaves but finish with ch.2 instead of 9.
– With a yarn needle, insert the thread of the larger leaves into the soil part, and secure with knots on the other side. Do the same with the small and smaller leaves. The smaller leaves should be closer to the center.
Scatter the leaves around.
Make a double knot on the other side to secure the leaves.
Get closer to the center as you go (the closer to the center, the smaller the leaves)
– Cut a piece of cardboard of plastic sheet to put at the bottom of the pot, then stuff your pot. Sew the soil part and pot together. You can stuff your pot a little more while sewing, but do not overstuff. You want to keep the brown soil part somewhat flat.
Use the back stitches inside the pot to sew the two parts together.
BIG FLOWER: – With yellow yarn, ch. 7
Rnd 1: 3 DC in 3rd ch from hook, 3 DC in each st of the row (15) Fasten off, glue the two ends of the flower together, then glue to the center of the leaves.
Curl and glue the two ends together
SMALL FLOWERS (make 5): – With yellow yarn, ch. 7
Fasten off. Make a tight knot with the two threads. To hide the threads, insert them into the ball with a yarn needle, pull on the other side and cut. Glue them on the branches of the leaves as you see fit.
Make a chain, then make a knot with the two threads.
Voila! Your flower potted plant is done. I hope you enjoyed this pattern, and if you have any questions don’t hesitate to ask me in the comments section.
I love cactus plants, but since I do not have a green thumb I decided to make one with yarn since a crocheted cactus never needs watering, and never dies!
This little desert cactus is about 5.5 inch tall, crocheted with a 2.75mm hook and medium/4 worsted yarn (I used Red Heart Super Saver). This amigurumi is crocheted in continuous spirals without joining the rounds.
Materials:
– Yarn: brown, dark brown, green, and scraps of white
– 2.75mm crochet hook
– Polyester fiberfill for stuffing
– Thick piece of cardboard
– Stitch marker
– Yarn needle
– Pins
– Glue gun, or fabric glue
Abbreviations:
ch = chain
rnd = round
st = stitch
sc = single crochet
dc = double crochet
sl st = slip stitch
inc = increase
dec = dec
FLO = front loop only
BLO = back loop only
THE PATTERN
Pot: – With brown yarn, start with magic ring
Rnd 1: 5 sc in center of the ring (5)
Rnd 2: 2 sc in each st around (10)
Rnd 3: [1 sc, inc] 5 times (15)
Rnd 4: [2 sc, inc] 5 times (20)
Rnd 5: [3 sc, inc] 5 times (25)
Rnd 6: [4 sc, inc] 5 times (30)
Rnd 7: BLO, sc in each st around (30)
Rnd 8: [5 sc, inc] 5 times (35)
Rnd 9 to 12: sc in each st around (35)
Rnd 13: ch 2, FLO: dc in same stitch, then in each st around (35) – Join the row with a sl st. Fasten off, and weave the remaining thread into the stitches of the pot.
– Cut a circle in a piece of thick cardboard to place at the bottom of the pot. This will keep it flat. Start stuffing up to the back stitch line inside the pot.
Cactus and dirt: – With green yarn, start with magic ring
Rnd 1: 5 sc in center of the ring (5)
Rnd 2: 2 sc in each st around (10)
Rnd 3 to 20: sc in each st around (10) – Change yarn to dark brown
Rnd 21: [1 sc, inc] 5 times (15)
Rnd 22: [2 sc, inc] 5 times (20)
Rnd 23: [3 sc, inc] 5 times (25)
Rnd 24: [4 sc, inc] 5 times (30)
Rnd 25: [5 sc, inc] 5 times (35) – Fasten off, leave a long tail for sewing. (Do not sew to the pot yet)
Cactus branch (small) : – With green yarn, make a magic ring
Rnd 1: 5 sc in center of the ring (5)
Rnd 2: 2 sc in each st around (10)
Rnd 3 to 6: sc in each st around (10)
Rnd 7: 5 sl st, 5 sc (10) – Do not make your sl st too tight
Rnd 8: sc in each st around (10)
Rnd 9: 5 sl st, 5 sc (10)
Rnd 10: sc in each st around (10)
Rnd 11: 5 sl st, 5 sc (10)
Rnd 12: sc in each st around (10) – Fasten off, leave a long tail for sewing.
Cactus branch (Large): – With green yarn, make a magic ring
Rnd 1: 5 sc in center of the ring (5)
Rnd 2: 2 sc in each st around (10)
Rnd 3 to 10: sc in each st around (10)
Rnd 11: 5 sl st, 5 sc (10)
Rnd 12: sc in each st around (10)
Rnd 13: 5 sl st, 5 sc (10)
Rnd 14: sc in each st around (10)
Rnd 15: 5 sl st, 5 sc (10)
Rnd 16: sc in each st around (10) – Fasten off, leave a long tail for sewing. Stuff all the parts firmly with fiberfill.
– Use pins to position the branches on each side of the cactus, and sew them.
– Sew the cactus to the pot using the back stitches inside the pot. You can stuff your pot a little more as you go, but do not overstuff. You want to keep the brown dirt part flat.
Flower: -With off-white yarn, ch.6
Rnd 1: 3 sc in second ch. From hook, then 3 sc in each st on the row (15) Fasten off, weave the remaining threads into the row. Twist in a flower shape and glue the 2 ends together. Glue on top of one of the cactus branches.
Voila! The cactus is done. I hope you enjoyed this pattern, and if you have any questions don’t hesitate to write a comment!