I bought a BTS biography and of course, my crafter’s brain couldn’t help thinking about crocheting a cover for it! I shared the results on my IG and Twitter (now X) accounts and a lot of people asked if I could create a tutorial. So I made another one to film the steps and uploaded it on YouTube.
I have the US edition of the book but the tutorial can be applied to any edition. I used Caron Simply Soft for the project but I recommend cotton yarn for durability. I also used a 2.75mm hook to keep the stitches tight.
I learned how to make puff stitch flowers with the help of a great tutorial I found on YouTube, by NHÀ LEN. the logos are made with black felt.
If you crochet this cover please send me pics on my ig, I love seeing finalized projects from my tutorials! Also, if you have any questions, please leave a comment on YouTube.
Two weeks ago I came up with a pattern to crochet the new Mang and a lot of people were interested in the pattern. I started filming it for YouTube but since I have a lot of ongoing projects it is taking longer than I expected. So I asked if people would be interested in the written version if they don’t want to wait for the video. This version has no photos, just written instructions but I hope it will be enough for you to make your own. The video version will be available in a few weeks.
Note: Do not redistribute this pattern or use the finished doll for commercial purposes, thank you.
Materials:
4/medium acrylic or cotton yarn in Lavender, white, and light blue (I recommend using the same brand & weight for both colors)
2.75mm crochet hook
Fiberfill for stuffing
9mm safety eyes
Felt in black, red and pink
yarn needle
Abbreviations:
Rnd = round
sc = single crochet
inc = increase
dec = decrease
st = stitch
ch = chain
L = lavender color
W = white color
LEGS/BODY: (starts with lavender)Make a magic ring
Rnd 1: 5 sc in center of the ring (5)
Rnd 2: 2 sc in each st around (10)
Rnd 3: [1 sc, inc] x 5 times (15)
Rnd 4 to 6: sc in each st around (15)
Make 2. Don't fasten off the second leg, you will continue on with that thread to crochet the body.
Second leg, ch 1, attach to other leg with one single crochet. (will count as a stitch in the next round).Crochet one more single crochet and put a stitch marker on that last stitch.
Rnd 7: L. leg 14 sc, 1 sc in chain stitch, R. leg 16 sc, 1 sc in other side of chain stitch, L. leg 2 sc (34)
Rnd 8 to 17: sc in each st around (34)
Rnd 18: 8 sc, dec, 15 sc, dec, 7 sc (32)
Rnd 19: sc in each st around (32)
Rnd 20: [2 sc, dec] x 8 times (24)
Stuff the body with fiberfill and continue with same thread to make the head. You will need white thread to change colors along the way.(W is white and L is for lavender). Continue stuffing along the way.
Rnd 21: 3 sc, inc, 3 sc (change to W on last stitch), inc, 3 sc, inc, 3 sc, inc, 3 sc (change to L on last stitch), inc, 3 sc, inc (30)
Rnd 22: 4 sc, inc, 3 sc (change to W), 1 sc, inc, 4 sc, inc, 4 sc, inc, 3 sc (change to L), 1 sc, inc, 4 sc, inc (36)
Rnd 23: 5 sc, inc, 3 sc (change to W), 2 sc, inc, 5 sc, inc, 5 sc, inc, 3 sc (change to L), 2 sc, inc, 5 sc, inc (42)
Rnd 24: 6 sc, inc, 3 sc (change to W), 3 sc, inc, 6 sc, inc, 6 sc, inc, 3 sc (change to L), 3 sc, inc, 6 sc, inc (48)
Rnd 25: 6 sc, inc, 2 sc, inc, 1 sc (change to W), 1 sc, inc, 2 sc, inc, 14 sc, inc, 2 sc, inc, 1 sc (change to L), 1 sc, inc, 2 sc, inc, 8 sc (56)
Rnd 26: 8 sc, inc, 2 sc, inc, 1 sc (change to W), 1 sc, inc, 2 sc, inc, 18 sc, inc, 2 sc, inc, 1 sc (change to L), 1 sc, inc, 2 sc, inc, 10 sc (64)
Rnd 27: 10 sc, inc, 2 sc, inc, 1 sc (change to W), 1 sc, inc, 2 sc, inc, 22 sc, inc, 2 sc, inc, 1 sc (change to L), 1 sc, inc, 2 sc, inc, 12 sc (72)
Rnd 28 to 30: 17 sc (change to W), 36 sc (change to L), 19 sc (72)
Rnd 31: 14 sc, dec, 1 sc (change to W), 1 sc, dec, 1 sc, dec, 24 sc, dec, 1 sc, dec, 1 sc (change to L), 1 sc, dec, 16 sc (66)
Next round starts the eye patches
Rnd 32: 23 sc (change to W), 9 sc (change to L), 2 sc (change to W), 9 sc (change to L), 23 sc (66)
Rnd 33 to 36: repeat same step
Rnd 37: 24 sc (change to W), 7 sc (change to L), 4 sc (change to W), 7 sc (change to L), 24 sc (66)
Rnd 38: 25 sc (change to W), 5 sc (change to L), 6 sc (change to W), 5 sc (change to L), 25 sc (66)
Continue with Lavender color only
Rnd 39 to 42: sc in each st around (66)
Rnd 43: [9 sc, dec] x 6 times (60)
Rnd 44: [8 sc, dec] x 6 times (54)
Rnd 45: [7 sc, dec] x 6 times (48)
Rnd 46: [6 sc, dec] x 6 times (42)
Rnd 47: [5 sc, dec] x 6 times (36)
Rnd 48: [4 sc, dec] x 6 times (30)
Rnd 49: [3 sc, dec] x 6 times (24)
Rnd 50: [2 sc, dec] x 6 times (18)
Rnd 51: [1 sc, dec] x 6 times (12)
Rnd 52: dec 5 times (7)
Fasten off and leave a long tail for sewing. Finish stuffing. With a yarn needle, insert your thread in each front loop of last stitch and pull the thread to close the hole.
ARMS: (lavender)Make a magic ring
Rnd 1: 5 sc in center of the ring (5)
Rnd 2: 2 sc in each st around (10)
Rnd 3 to 12: sc in each st around (10)
Fasten off and leave a long tail for sewing. Stuff the arms but do not stuff too much on top.
There are two ways you can attach the arms to the body. I like to sew the arms shut with the remaining thread and glue them to the body. If you prefer you can sew the arms directly to the body.EARS: (lavender and light blue)Make a magic ring with lavender color
Rnd 1: 6 sc in center of the ring (6)
Rnd 2: 2 sc in next 3 stitches (change to B on last stitch), 2 sc in next 3 stitches (change to L on last stitch) (12)
Rnd 3: [1 sc, inc] x 3 times (change to B on last stitch), [1 sc, inc] x 3 times (change to L on last stitch) (18)
Rnd 4: [2 sc, inc] x 3 times (change to B on last stitch), [2 sc, inc] x 3 times (change to L on last stitch) (24)
Rnd 5: [3 sc, inc] x 3 times (change to B on last stitch), [3 sc, inc] x 3 times (change to L on last stitch) (30)
Rnd 6 to 7: 15 sc (change to B), 15 sc (change to L) (30)
Rnd 8: [3 sc, dec] x 2 times, 2 sc, dec, 1 sc (change to B), [3 sc, dec] x 3 times (change to L) (24)
Rnd 9: 12 sc (change to B), 12 sc (24)
Fasten off and leave a long tail for sewing. Flatten the ear and sew it shut with the remaining thread. Fold the ears at the bottom and glue them to the head. (I find it easier this way than sewing them directly to the head)SCARF: (light blue color)
Make a slip knot in your hook and crochet a chain of 40 stitches.
Row 1: 14 sc, 3 hdc, 1 dc, in next stitch [1 dc, ch 1, 1 dc], 3 hdc, 17 sc.
Fasten off and weave in your remaining thread.
That's it. I hope you enjoy this pattern and if you have any questions don't hesitate to ask me on IG at Pyroprincess7. If you find any typos let me know as I did not get this pattern tested for it. (hopefully I didn't make any typos). Happy crocheting!
I put together a crochet tutorial to make a Yoongi/Agust D doll inspired by the Haegeum music video. If you are interested here are the links below. The tutorial is divided into three parts, body, head, and hair. I used a 4/medium acrylic yarn and a 2.75mm hook. I recommend using the same brand for all the pieces, especially the head, and hair, otherwise, the size will not match. I had a lot of fun creating the pattern and I hope you will enjoy the tutorial!
the doll is very small, it fits in the palm of my hand. All the materials are listed in the description box of the video. The little belt buckle was purchased on Amazon, the link is also in the description box. The chopsticks were made with two pieces of wood stick that I painted red. The chain was purchased at Michaels.
If you have any questions about this doll or tutorial, please don’t hesitate to ask me in the comments! Happy crocheting!
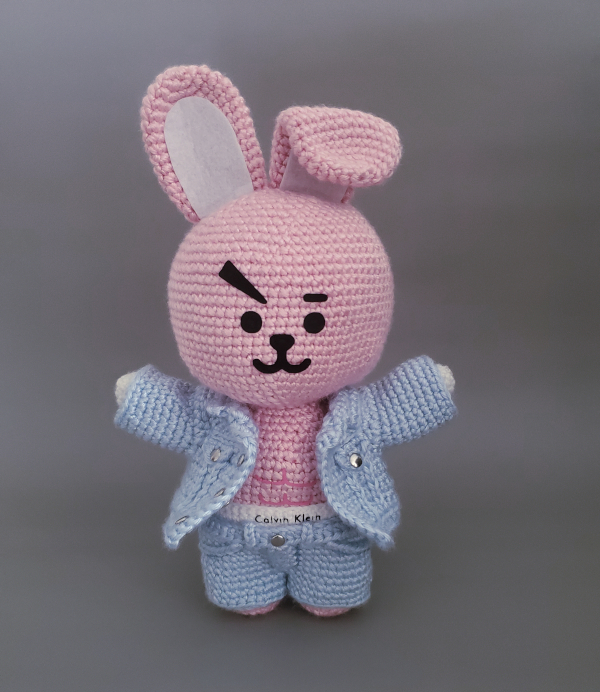
After seeing the ad of Jungkook for Calvin Klein I decided to crochet a version With Cooky. I thought it would be a cute idea to try. I used the tutorial that I already have on YouTube to make Cooky then improvised on the clothes. I was able to put my Cricut to good use to create the letters on his underwear band, face, and abs. It was quite easy to make, and I had a lot of fun in the process.
I tried to give him the same pose as his dad in the CK campaign. Looks very similar, no? LOL
I do have a tutorial for Cooky (without the clothes) so if you are interested you can find it on my YouTube channel.
I am a bit behind on my blog because I have been busy with so many projects for the past month. So I will try to post about everything I have done in the following weeks.
I took part in a fan art contest last month, it was a very sudden and last-minute decision so I only had a few days to complete it. The competition was to create a fan art piece based on the release of Jimin’s album (one of the members of BTS). I wanted to take part in it but since I couldn’t come up with any creative ideas I almost gave up until I saw the music video which was released three days before the deadline of the contest.
Luckily, I had a body/base in my storage box that I had crocheted to test one of the patterns I sell on ETSY, which saved me some time since I only had three days to complete it.
I used my Cricut Joy machine to cut the words of the poems tattooed on its chest. I was worried it wouldn’t work because the letters are so small but I was able to figure it out. The hardest part was to iron the vinyl under the head, so it took several trials to make it stick. I was really happy it worked out because the tattoo is the main focus of the doll.
I didn’t win the fan art contest, but I am still happy that I was able to participate because I really love this doll. If you are interested, the pattern for the body/base can be found on my ETSY.
I have two new tutorials on youtube to crochet very cute keychains: cat, strawberry, and tangerine keychains. I am currently making a bunch to give away as freebies at a concert I am going to and decided to share my pattern in case anybody would be interested to make their own.
They are very easy and take no time to make. I used Caron Simply Soft and a 2.75mm hook but you can pick any type of yarn or crochet size.
I hope you will enjoy these tutorials and if you like them or have any questions please let me know in the comments! Happy crocheting!
I just uploaded a new tutorial on my YouTube Channel! it’s a cute Purple heart plant inspired by Valentine’s day. The plant is about 8 inches tall, but the final size will depend on your yarn and crochet hook. I used a 4/medium acrylic yarn (Caron Simply Soft) and a 2.75mm hook. You will need some metallic wire for this project to wrap the leaves and stem. It’s quite easy to make, it only took me one day to crochet. I hope you will enjoy this tutorial, happy crocheting!
Like a flower… Flower work (Wild Flower by RM). I made this bouquet of flowers inspired by this song and the album Indigo. I had crocheted flowers before but not so intricate, so to learn the techniques I went through diverse tutorials I found on YouTube.
I crocheted three zinnias in 3 shades of blue. Even though the tutorial did not ask for wires I added some along the edge of the petals to make them more sturdy. The pattern is by Gonkui crochet on YouTube. She specializes in crocheting plants and flowers and has amazing tutorials to learn the techniques: GONKUI CROCHET. The lavender is a pattern by MAGDELINA MITHZ and the jasmine flowers are from NATAGOR FINLAYSON. They both also have a wide selection of flower tutorials.
I had a specific idea of what kind of vase I wanted so I bought a glass jar at the store and painted it in blue tones and added white for a little bit more texture. I used glass paint and finished with a glaze coat to seal it. This was my first experience with paint but I am really with the result!
I really enjoyed this project! I learned a lot of new techniques and I can’t wait to try more flowers. I forgot to mention that I used “I love this cotton” which is a 4/medium cotton yarn. I crocheted with a 2.75mm hook which is bigger than the size recommended in the tutorial but that’s what I am most comfortable with. I have a hard time crocheting 4 ply yarn with smaller hooks.
Last month I crocheted an astronaut inspired by the song “The Astronaut” by Jin of BTS. It turned out so cute I decided to share the pattern in case anybody would be interested to make their own. I ended up making two dolls, one for myself and another to write the pattern.
I made a stand for the first doll and customized the backpack with the BTS logo and print transfers of RJ and Wootteo. I also wrote lyrics from the first verse of the song on the back of the stand.
The pattern is available on ETSY. The doll is about 9 inches tall and crocheted with a 4/medium yarn (I used Caron Simply Soft) and a 2.75mm hook. It is very easy to make, I put a lot of photos to add to the instructions. The pattern does not include the stand but I am going to make a YouTube tutorial for it very soon
If you have any questions about this pattern don’t hesitate to ask me! I wish you all a happy new year with lots of smiles and laughter and lots of yarn and happy craft projects!
I am a big fan of K-dramas. One of my favorites is a historical fiction series that takes place during the Goryeo Dynasty in Korea. It’s the story of a girl from the 21st century who found herself transported into that time and tries to cope with her new surroundings and get entangled with the court dramas. She meets a prince, the 4th prince Wang So, who is the subject chosen for my latest project. I wanted to make that doll for a very long time because I love the character, hair, and costume.
I picked his black costume from one of the most dramatic and memorable scenes in the series, which is all black. The doll is about 12 inches tall. I tried to give the face more shape this time around and I really like it!
Here is the original inspiration. I do want to make Hae Soo one of these days to complete the set. I just need to figure out which costume I want to make because there are so many beautiful ones!