Las Vegas Craft Group Project

Earlier this month I participated in a craft project with a group of fiber artists that created yarn bombing panels to celebrate the BTS concerts in Vegas. The idea was to make panels with appliques inspired by the “Permission to Dance” theme. Each of us worked on our own appliques for each panel to be displayed at the stadium. I decided to crochet road signs with BTS songs for one of them.

I got the idea from the signpost in the music video of PTD, but I just changed the names of the cities to songs to make it more fun. I used felt to cut the letters, I did it manually because I don’t have a Cricut. When I finished the signs I sent them to Carolyn, the crafter who knitted all the background for the appliques. She is super creative and really made a beautiful panel to display the signpost. She also made a panel for each member.

The background was custom-made by @bts_knit (IG)and also inspired by the music video of the song.

This was my contribution to this project, but there were a lot of participants and we ended up with a lot of panels. Some made whales, purple hearts and balloons, etc… Everybody was so creative and inspiring. I didn’t go to Vegas but the ones who did worked really hard on finding the right location and set up the yarn bombing display on the same day they went to the concert. Here are all the pictures they took of the final setup:

Contributors: @Makrokosmos_21, @kiranimnida, @Alissa_0613, @momengineerarmy, @2ndGradeArmy0t7, @JkRisade, biastapes, @SmittenKitMit, @bts_knits, @Coldfloral, @Mybtsstanacct1, @Abbyj357, @mamamochimolala.

Shooky Crochet Pattern

The video version of this pattern is now available on YouTube https://missdolkapots.wordpress.com/2020/05/18/shooky-video-tutorial/

I love BT21 characters, they are so cute and lovable. I recently crocheted a Shooky for a giveaway, he is the easiest character to crochet out of all of them. I thought it would be great idea to upload my pattern for those who would like to have fun making their own. It is a very easy project and I think beginners will enjoy it a lot.

For this pattern you will need:

  • 2 balls of yarn of different shade of browns (mine is almond and dark brown)
  • Felt: brown, black and white
  • 2.75mm hook
  • fiberfill for stuffing
  • yarn needle
  • glue gun, or fabric glue

Abbreviations:

  • ch = chain
  • rnd = round
  • sc = single crochet
  • inc = increase
  • dec = decrease
  • st = stich

BODY:
With brown yarn, make a *magic ring
Rnd 1: 6 sc in center of the ring (6)
Rnd 2: 2 sc in each st around (12)
Rnd 3: [1 sc, inc] 6 times (18)
Rnd 4: [2 sc, inc] 6 times (24)
Rnd 5: [3 sc, inc] 6 times (30)
Rnd 6: [4 sc, inc] 6 times (36)
Rnd 7: [5 sc, inc] 6 times (42)
Rnd 8: [6 sc, inc] 6 times (48)
Rnd 9: sc in each st around (48)
Rnd 10: 19 sc, inc, sc, inc, sc, inc, 19sc, inc, sc, inc, sc, inc (54)
Rnd 11 to 20: sc in each st around (54)
Rnd 21: 19 sc, dec, sc, dec, sc, dec, 19sc, dec, sc, dec, sc, dec (48)
Rnd 22: sc in each st around
Rnd 23: [6 sc, dec] 6 times (42)
Rnd 24: [5 sc, dec] 6 times (36)
**Start stuffing the body with fiberfill and continue along the way.
Rnd 25: [4 sc, dec] 6 times (30)
Rnd 26: [3 sc, dec] 6 times (24)
Rnd 27: [2 sc, dec] 6 times (18)
Rnd 28: [1 sc, dec] 6 times (12)
Rnd 29: dec 6 times (6)
Fasten off and leave a long tail for sewing. Embroider the rest of of the thread into each front loop of the remaining stitches. Pull the string to close the hole.

*if you don’t know how to make a magic ring, here is a YouTube tutorial:
** do not stuff the body too much, you don’t want it to turn it into a round ball.

ARMS (make 2):
With dark Brown yarn, 4 st in ch
Rnd 1: 2 sc, inc, turn to the other side of the chain, 2 sc (6)
Rnd 2: [inc, 2 sc] 2 times (8)
Rnd 3: [inc, 3 sc] 2 times (10)
Rnd 4: sc in each st around (10)
Rnd 5: [inc, 4 sc] 2 times (12)
Rnd 6: sc in each st around (12)
Fasten off and leave a long tail for sewing. Stuff the arms lightly and sew them to each side of the body.

LEGS (make 2):
With dark Brown yarn, 6 st in ch
Rnd 1: 4 sc, inc, turn to the other side of the chain, 3 sc, inc (11)
Rnd 2: inc, 10 sc (12)
Rnd 3: sc in each st around (12)
Rnd 4: [inc, 5 sc] 2 times (14)
Rnd 5: sc in each st around (14)
Fasten off and leave a long tail for sewing. Stuff the legs lightly and sew them to each side of the body.

Now you just need to cut the pieces to make the mouth, teeth, eyes and eyebrows. Glue everything on the face, you can use a pic of Shooky as a guide. (I put everything on the face before using the glue)

If you have any questions about this tutorial, don’t hesitate to ask me in the comments, I will do my best to answer if you have any problems following the pattern.

Happy crocheting!

Note: Shooky is a trademark character of BT21, please do not use this tutorial for commercial use.

Little airplane pattern

I had promised that I would upload more free patterns this year, so here is one to make a really cute little airplane.

The plane is about 4 inch long, crocheted with Caron Simply Soft yarn and a 2.75mm hook. I recommend this yarn or similar because the thread is a bit thinner even though it is a medium/4 worsted yarn. If you use another brand it’s fine, the plane will just turn out a little larger.

airplane pattern

AIRPLANE PATTERN

Materials:
1 medium/4 worsted yarn – blue (Caron Simply Soft)
2.75mm crochet hook
Polyester fiberfill for stuffing
Stitch marker
Yarn needle
Felt, red and black
Glue gun, or fabric glue

Abbreviations:
ch = chain
rnd = round
st = stitch
sc = single crochet
inc = increase
dec = dec
rnd = round

Note:
This ornament is crocheted in continuous spirals without joining the rounds. The size is approx. 4 inch long.

Body of plane (starts at tail):
With blue yarn, make a ch. of 4 st.
Rnd 1: 2 sc, inc, turn to the to the other side of the chain, 1 sc, inc (7)
Rnd 2: inc, 1 sc, inc 2 times, 3 sc (10)
Rnd 3: inc, 3 sc, inc 3 times, 2 sc, inc (15)
Rnd 4 to 5: sc in each st around (15)
Rnd 6: dec 2 times, 11 sc (13)
Rnd 7: dec 2 times, 7 sc, dec (10)
Rnd 8: dec, 6 sc, dec (8)
Rnd 9: [1 sc, inc] 4 times (12)
Rnd 10: [2sc, inc] 4 times (16)
Rnd 11: inc 4 times, 12 sc (20)
Start stuffing, and continue a long the way
Rnd 12 to 23: sc in each st around (20)
Rnd 24: [2 sc, dec] 5 times (15)
Rnd 25: [1 sc, dec] 5 times (10)
Rnd 26: dec 5 times (5)
Fasten off. Embroider the thread in the stitches of the last row to close the hole.

DSCN8705

Wings (Make 2):
With blue yarn, start with a magic ring
Rnd 1: 5 sc in center of the ring (5)
Rnd 2: 2 sc in each st around (10)
Rnd 3: [1 sc, inc] 5 times (15)
Rnd 4 to 9: sc in each st around (15)
Fasten off, and leave a long tail for sewing. Stuff them but not too much, you want the wings to remain flat, and not round.

wings of plane

Sewing the wings:
Position the wings on each side of the plane and pin them with needles. Sew around using the stitches of the wing and plane to attach them together. Weave in loose end.

how to sew wings
Insert the needle in one of the stitches of the plane, then in one of the stitches of the wings. Continue all the way around. Make sure that both wings are leveled.

Propellers:
Cut two piece of red felt in the shape of propellers, about 1 inch long. Cut a circle in black felt. Glue the propellers first to the front of the plane, then the circle on top of them.

DSCN8716

Voila! your little airplane is ready to take off. I hope you enjoyed this pattern, and if you have any questions don’t hesitate to ask me in the comments box below.

Sun, here we come!

I don’t know about you but it’s already summer in my part of the world. It’s only a few weeks away from summer anyway, and to celebrate my favorite season of the year, I decided to post a pattern to make a cute 3d sun that you can use as a decoration, or warm up your days if summer has not arrived in your neck of the woods yet. The kids will love it!

A cute little sun crochet project

You will need:
– Orange or yellow yarn (I used red heart/super saver solids)
– 4mm/G crochet hook
– Yarn needle
– Fiberfill for stuffing
– Iron spray starch
– Googly eyes

Abbreviations:
rnd = round
st = stitch
sc = single crochet
inc = increase
dec = decrease
BLO = back loop only
ch = chain
hc = half double crochet
dc = double crochet
tr = treble

PATTERN

Ball:
– With orange yarn, make a magic ring
Rnd 1: 6 sc in center of the ring (6)
Rnd 2: 2 sc in each st around (12)
Rnd 3: [1 sc, inc] 6 times (18)
Rnd 4: [2 sc, inc] 6 times (24)
Rnd 5: [3 sc, inc] 6 times (30)
Rnd 6 to 7: sc in each st around (30)
Rnd 8: BLO, sc in each st around (30)
Rnd 9: sc in each st around (30)
Rnd 10: [3 sc, dec] 6 times (24)
Rnd 11: [2 sc, dec] 6 times (18)
– Start stuffing, and continue along the way
Rnd 12: [1 sc, dec] 6 times (12)
Rnd 13: dec 6 times (6)
– Fasten off, cut the yarn and weave in the remaining thread in the stitches to close the hole.

row 5 in back loops only
Row 8 in back loops only

Front and side view of the ball.

Sun Rays:
With orange yarn, ch 8
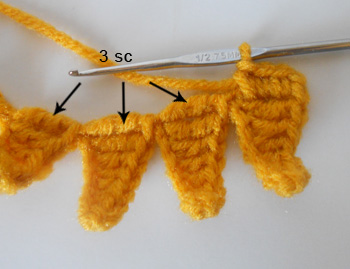
*1 sc in second st from chain, 2 hdc in next 2, 2 hc in next 2, Tr in next 2. ch. 8, continue from * until you get 10 triangles on the chain. Do not fasten off
ch 1, 3 sc in edge of each triangle (30 sc). Fasten off, and leave a long tail for sewing.

the triangles are worked continuously
The triangles are worked continuously

the edge is made by working 3 sc in each triangle

Use some iron spray starch to uncurl the triangles. Once dry, you can sew them around the ball using the front stitches of both parts. weave in loose ends.

Sew around using front  loop only.
Sew around using front loop only.

Glue the googly eyes. and embroider the mouth with some brow yarn or embroidery thread.

Voila! You can use a hook or attach a piece of yarn on top to hang it. I hope you enjoyed this pattern, and if you find any errors don’t hesitate to let me know!

Happy crocheting!

Valentine’s day heart freebie

Last month I had published a post about  heart ornaments I had crocheted for a friend of mine. I had made a promise that I would publish the pattern on my blog by the time Valentine’s day would be just around the corner, so here it is, my Valentine’s Heart pattern. It is very easy and  as usual, doesn’t take long to make. Enjoy!

Amigurumi Heart - Valentine's day pattern
Amigurumi Heart – Valentine’s day freebie

The heart is about 3 1/2 inches. It is decorated with a ribbon and a rose, but it can be used as a base for any kind of decoration.

You will need:
– Pink yarn (I recommend Caron Simply Soft, or similar)
– 2.75mm hook
– Polyester fiberfill for stuffing
– Yarn needle
– Pink ribbon
– Fabric red rose (I found mine at JoAnn, it comes in a package with different colors)
– Glue gun, or fabric glue

abbreviations:
rnd = round
sc = single crochet
inc = increase
dec = decrease
st st = slip stich

THE PATTERN

Buns, (make 2):
With pink yarn or color of your choice, make a magic ring
Rnd 1: 5 sc in center of the ring (5)
Rnd 2: 2 sc in each st around (10)
Rnd 3: [1 sc, inc] 5 times (15)
Rnd 4: [2 sc, inc] 5 times (20)
Rnd 5: [3 sc, inc] 5 times (25)
Rnd 6 to 7: sc in each st around (25)
Do not cut the thread  from the yarn when you finish the second bun, you will slip stitch with the first bun.

The two buns for the heart

Body:
Attach the two buns together with 4 sl st. The row start at the next stitch.

buns_graph
Rnd 1: sc in each st around (42)
Put a stitch marker at last stitch to mark the end of the row.
Rnd 2: 7 sc, dec, 2 sc, dec, 14 sc, dec, 2 sc, dec, 9 sc (38)
Rnd 3: sc in each st around (38)
Rnd 4: 6 sc, dec, 2 sc, dec, 13 sc, dec, 2 sc, dec, 7 sc (34)
Rnd 5: sc in each st around (34)
Rnd 6: 6 sc, dec, 2 sc, dec, 11 sc, dec, 2 sc, dec, 5 sc (30)
Rnd 7: sc in each st around (30)
Rnd 8: 6 sc, dec, 1 sc, dec, 10 sc, dec, 1 sc, dec, 2 sc, dec (25)
Start stuffing, and continue along the way.
Rnd 9: [3 sc, dec] 5 times (20)
rnd 10: sc in each st around (20)
Rnd 11: [2 sc, dec] 5 times (15)
Rnd 12: sc in each st around (15)
Rnd 13: [1 sc, dec] 5 times (10)
Rnd 14: dec 5 times (5)
Fasten off, leave a long tail for sewing. With a yarn needle, close the hole by inserting the thread in the remaining stitches.

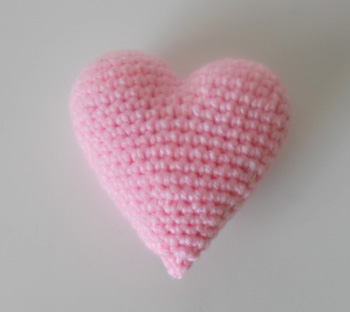
The heart
The naked heart

Decor:
– Option 1: Cut a piece of pink ribbon, make a bow and glue to the heart.
– Option 2: Insert the ribbon between to stitches of the heart using a yarn needle, then make the bow.
– Glue the flower on the ribbon.

valentine's day heart, by Miss Dolkapots
This is a very cute gift for your loved ones!

Voila! I hope you enjoyed this pattern, let me know if you have any questions, or if you like this pattern. My next post will be about different ideas to decorate a heart, using the same pattern.

Happy crocheting!