Flower Bouquet

Like a flower… Flower work (Wild Flower by RM). I made this bouquet of flowers inspired by this song and the album Indigo. I had crocheted flowers before but not so intricate, so to learn the techniques I went through diverse tutorials I found on YouTube.

I crocheted three zinnias in 3 shades of blue. Even though the tutorial did not ask for wires I added some along the edge of the petals to make them more sturdy. The pattern is by Gonkui crochet on YouTube. She specializes in crocheting plants and flowers and has amazing tutorials to learn the techniques: GONKUI CROCHET. The lavender is a pattern by MAGDELINA MITHZ and the jasmine flowers are from NATAGOR FINLAYSON. They both also have a wide selection of flower tutorials.

I had a specific idea of what kind of vase I wanted so I bought a glass jar at the store and painted it in blue tones and added white for a little bit more texture. I used glass paint and finished with a glaze coat to seal it. This was my first experience with paint but I am really with the result!

I really enjoyed this project! I learned a lot of new techniques and I can’t wait to try more flowers. I forgot to mention that I used “I love this cotton” which is a 4/medium cotton yarn. I crocheted with a 2.75mm hook which is bigger than the size recommended in the tutorial but that’s what I am most comfortable with. I have a hard time crocheting 4 ply yarn with smaller hooks.

Little Rhinoceros

A friend of mine asked me to crochet a Rhinoceros that she wanted to gift for her husband’s birthday. She showed me a picture of an amigurumi she likes so I tried to find the pattern for it since the name was mentioned in the picture. Canal Crochet is a YouTuber and blogger that has amazing tutorials, and her rhinoceros was one of them. It is in Spanish but if you are familiar with crochet techniques it is easy to understand the pattern just by watching the video (it also made me want to learn Spanish too!).

I really enjoyed making this amigurumi, I learned a new technique in the process (the feet and body is crocheted seamlessly). I did make one mistake though, I didn’t put weight into the body like she did, because I did not understand the purpose of what she was doing since I don’t understand Spanish. As a result, I ended up with a rhinoceros that couldn’t stand on its feet. I had two solutions, one was to remake the entire thing or to think outside the box. That’s when I came up with an idea.

I bought a wood stand and made a crocheted cover that I glued over it. I was able to glue the rhinoceros on it and turn my amigurumi into a small figurine. I liked it so much I was almost thankful for my mistake! LOL

My friend was very happy with the rhinoceros I made, but credit goes to Canal Crochet for creating such a beautiful pattern. I recommend you to checkout her YouTube channel, there are a lot of very cute amigurumi tutorials! She also has her patterns in written format, you can find the links in her description box.

Baby Captain America

It’s already the end of the year and I just finished my last doll until 2019. A friend of mine asked me if I could make her a baby version of Captain America and I immediately said yes, I was very excited to start this project. I started two weeks ago and just finished it today. Here is the result:

I used a pattern by Mariya Kozlova – Baby with Dummy to make the base. It’s a free tutorial to crochet a baby doll which is well written and easy to follow. I only had to make a few adjustments and color changes to turn it into Captain America.

I crocheted this doll with Red Heart Super Saver and a 2.75mm hook.  The stars, the A letter, and wings are cut in white felt. I did make the head a little smaller than instructed on the pattern because I was afraid it would be too big with the mask on top of it.

The mask was my biggest challenge because I had never crocheted one before. My first attempt was a fail, I had made the holes too wide and too loose. It took me three tries to get it right which is not too bad considering that I had no idea what I was doing.

I considered making a pacifier that looked like his shield but opted otherwise after realizing it would be too much going on. It had to be one or the other and I can’t imagine Captain America without his signature shield. No pacifier for this baby, he’s a tuff one anyway!

I had a lot of fun crocheting this little Captain America, I couldn’t have finished the year on a better note. I am really looking forward to next year for new exciting projects. I have a long wish list!

This is my last post of the year so I would like to take this opportunity to wish you a Merry Christmas and a Happy new year. See you in 2019! 🙂

Table Runner project

Blankets and other Household items are not my specialties but I really wanted to add a splash of colors in my living room this spring. I wasn’t sure what I was looking for until I ran into a table runner pattern while looking for ideas on Pinterest. Created by a lady named Marinkle, it’s a simple but beautiful crocheted piece made of hexagons that can be used in different ways or different projects. I was hooked from the beginning!

IMG_8714

If you love playing with colors like I do, this tutorial is a treat. I picked two shades of blue, light brown and tan colors as well as some white for the border (I used Lily Sugar’n Cream yarn). I had to make 22 hexagons for my table runner, and it didn’t take very long as each piece only took half an hour to crochet.

IMG_8717

My table is very narrow so I only make two rows of hexagons instead of three. The pieces are joined together with a single crochet but the pattern also suggests also using a slip stitch as an alternative.

IMG_8731

I really think it’s a great project for beginners, the tutorial is very easy to follow and simple enough to understand. I had a great time working on this project and I loved how it turned out. It’s the first thing people notice when they walk into the living room, it really stands out.

IMG_8730

I intend to make matching cushions for the sofa someday, and coasters. I think it will really make the room sparkle with colors. If you are interested in this pattern, it’s free and available on Merinkle’s blog.

Happy crocheting!


January Bugs

It’s been a while since I posted anything on my blog but the end of the year was such a busy time for me that I didn’t get a chance to post anything. One of my resolutions for this year is to upload content every Friday with more showcases and projects, tutorials and patterns. If you have any suggestions feel free to let me know in the comments.

Today I am going to talk about some really cute crocheted bugs I made from a pattern I found on Pinterest. I definitely recommend this one if you are looking for craft projects this year.  The pattern is from Belova Elena, a very talented lady who posted the tutorial on a Russian craft site (link at the end) . I was able to use the google translator to figure out the words and if you are familiar with crochet patterns I think you will have no problem reading it either.

IMG_8627

I followed her instructions to crochet the head, body, arms and legs then decided to take a shortcut and made the eyeballs and the wings with felt. I think both versions are very cute, mine just didn’t take as much time.

IMG_8629

I also used pompoms to make the nose and crocheted the antennas instead of using wires. One of the bug is a bee, the other a ladybug, and the third one is….green! They are about 8 inch tall using a 2.75mm hook and Red Heart Super Saver yarn. Size of crocheted animals always depend on the hook you use and the type of yarn you buy, it might end up larger or smaller.

IMG_8630

I love this ladybug, I think she turned out adorable. The original pattern ask for eyelashes but I didn’t have any and I thought it is cute enough as it is. Still, I am still considering adding some if I remember to pick some up when I go to the dollar store (I will need a lot of eyelashes).

IMG_8631.jpg

I made the wings of the ladybug with felt and glued some black dots that I cut from black felt. I always use a glue gun for my project, but fabric glue would work as well.

IMG_8635

I also used felt to make the stripes on the bee’s body. I could have crocheted them with black yarn but sometimes I just like to do things differently. Maybe I will crochet a little pot of honey to go with it if I have a chance it would look so cute!

IMG_8636

The bugs on the original pattern have an embroidered mouth. I might add one later, again when I have a chance but regardless, it’s cute as it is! I really loved her pattern, it is very easy basic therefore easy to make. You can make tons of different bugs of different colors and have a lot of fun with it.  I almost made a fly but Christmas was right around the corner and I had to get busy with other things.

If you are interested in this project, you can go to Elena’s insect patterns.  It’s a free pattern by the way! If you do try it but find it difficult to translate the language, you can always ask me for help.

I wish you a happy new year full of wonderful crocheted stuffed animals and fun projects!!!

Little bear and panda ornaments

I recently made little pandas and bears ornaments inspired by a pattern by All About Ami  that I found on Pinterest. I wanted mine to be smaller so I changed the pattern for the body and scarf. I also used a different size hook, and a different brand of yarn. Credit goes to Stephanie for creating this pattern.

img_7064

To make these bears I used regular acrylic yarn, a 2.75mm hook, some felt and fiberfill for stuffing. I glued googly eyes but you can opt for plastic safety eyes or embroidery (I always recommend embroidery for small children).

img_7293

I started round 1 to 5 like her pattern, then continued with:
Rnd 6 to 11: sc in each st around (30)
Change color to black for the panda
Rnd 12 to 13: sc in each st around (30)
Rnd 14: [3 sc, dec] 6 times (24)
Rnd 15: [2 sc, dec] 6 times (18)
Rnd 16: [1 sc, dec] 6 times (12)
Rnd 17: dec 6 times (6)
Fasten off

For the scarf, I made a row of 55 stitches, and 1 row of half double crochet. I followed the original instructions for the ears.

img_7288

To finish, I glued a little black pom-pom to make the nose. I think they turned out really cute! I love both versions of the ornaments, you can try both if you want to make small ones and larger ones. You can also check out all the cool free patterns she has on her blog, All About Ami.

Happy crocheting!

Little bee and booties

A friend of mine asked me if I could make a little bee to add to a baby blanket her grandmother crocheted, as well as a pair of baby booties to match the blanket. She wanted the bee to be three dimensional with a length of 4.5 inches, and the boots to be all black and yellow with a white top. I love to work with bees, and I love to work with different colors so I knew this would be a fun project!

img_7043

The booties are based on a pattern by Sarah, from Repeat Crafter Me. I followed the same instructions for the shoes but changed colors along the way. The sole is all black, followed by 3 rows of yellow and 2 rows of black. From row 9 I changed the pattern with 2 rows of single crochet in yellow, 2 rows of single crochet in black, and one row of single crochet in white with 3 increase in front. I finished by I adding little Poms Poms for an extra dose of cuteness.

img_7046

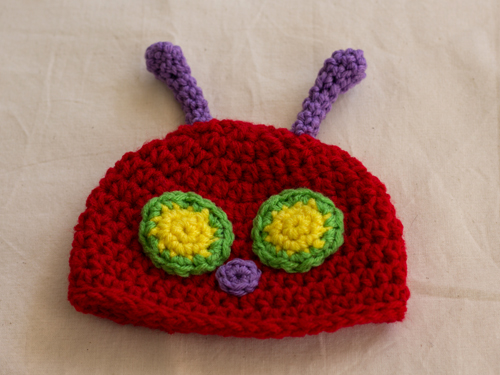
I came up with my own pattern to make the bee, which I wrote down on a piece of paper to share on my blog if anybody is interested. I used a 2.75mm hook, and basic acrylic worsted yarn (Red heart Super Savers) in white, yellow and black. The nose and eyes are made with felt, I had to use sharp small scissors to cut the pieces that small. I stuffed the bee with fiberfill, which can find at any craft store.

IMG_7047.jpg

BEE PATTERN

Abbreviations:
Rnd: round
sc = single crochet
inc = increase
dec = decrease
st = stitch
sl st = slip stitch
hdc = half double crochet
dc = double crochet
ch = chain
beg = beginning

– Body:
With black yarn, make a magic ring
Rnd 1: 5 sc in center of the ring (5)
Rnd 2: 1 sc in each st around (5)
Rnd 3: inc, 1 sc, inc, 1sc (7)
Change color to yellow
Rnd 4: inc, 3 sc, inc, 2 sc (9)
Rnd 5: inc, 8 sc (10)
Rnd 6: [1 sc, inc] 5 times (15)
Change color to black
Rnd 7: [2 sc, inc] 5 times (20)
Rnd 8: [3 sc, inc] 5 times (25)
Change color to yellow
Rnd 9 to 10: sc in each st around (25)
Change color to black
Rnd 11 to 12: sc in each st around (25)
Change color to yellow. Start stuffing and continue along the way
Rnd 13 to 14: sc in each st around (25)
Change color to black
Rnd 15 to 16: sc in each st around (25)
Change color to yellow
Rnd 17 to 18: sc in each st around (25)
Change color to black
Rnd 19: sc in each st around (25)
Rnd 20: [3 sc, dec] 5 times (20)
Change to yellow
Rnd 21: [2 sc, dec] 5 times (15)
Rnd 22: [1 sc, dec] 5 times (10)
Change to black
Rnd 23: inc each st around (20)
Rnd 24: [3 sc, inc] 5 times (25)
Change to yellow
Rnd 25 to 27: sc in each st around (25)
Rnd 28: [3 sc, dec] 5 times (20)
Rnd 29: [2 sc, dec] 5 times (15)
Rnd 30: [1 sc, dec] 5 times (10)
Rnd 31: dec each st around (5)
Fasten off, leave a long tail to embroider in the stitches to close the hole.

-Wings (make 4):
With white yarn, 10 st in a chain
Rnd 1: 1 sc, 1 hdc, 5 dc, 1 hdc, 3 sc in last st, turn to the other side of the chain, 1 hdc, 5 dc, 1 hdc, 1 sc, sl st to beg of ch
Fasten off, and embroider the remaining thread into the wing. Glue them on top of the body with a glue gun, or fabric glue.

– Antennas (make 2):
With black yarn, 6 st in a chain
Row 1: [1 sc, 1 hdc, 1 sc] in second st from ch, 4 sl st
Fasten off and leave a long tail to attach the antennas on top of the head with a double knot. Hide the remaining threads inside the head.

 – Eyes and nose:
Cut 2 circles in white felt, and slightly smaller ones in black. Glue the white ones in front of the head, and the black ones slightly below. Cut a circle in red felt for the nose and glue it underneath the eyes.

Voila, your fly is ready to fly! I made this bee to add to a blanket, but it can also be used as a very cute ornament, or a toy. I hope you enjoy this pattern, and if you have any questions don’t hesitate to ask me in the comments.

img_7049

Happy crocheting!

Drawstring Bags

Every once in a while I go into a phase where I just want to crochet one kind of thing and nothing else. It can go from a series of dolls to blankets to beanies or even mandalas, one obsession at a time.  Lately I have been obsessed with bags, all kind of purses from shopping bags to coin purses. Right now I am enjoying crocheting drawstring bag from patterns I found on Pinterest. I like them so much, I want to try them all!  The one I just finished is a granny square wrist purse, created by Joy Ballena, Crochet Crochet.

IMG_6921.jpg

Her pattern is very easy, and if you love making granny squares like I do, you will have a lot of fun! You can make several bags in no time.

IMG_6922

The ones I crocheted ended up being about 5 inch tall. I want to make smaller ones, and try different color combinations. Maybe add a flower on some of them to add a dose of cuteness.

IMG_6924

I used wood beads for the strings that I got at the craft store. I had to return the first set I bought because the hole wasn’t large enough for the yarn. I found these at Jo-Ann, and they worked perfectly.

IMG_6926

My pink and green string bag. I love these colors, they remind me of my favorite summer fruit, watermelon!

IMG_6928

It opens and close very easily, I am really happy with these bags. It is also a great project for beginners with a basic knowledge of crochet stitches.

This was a fun project, and I can’t wait to try some of the other patterns I pinned on my Pinterest!

Happy crocheting!

Here comes the Pikachu

Not long ago my mum asked me if I wouldn’t mind making a Pikachu for my little nephew who is only two years old but already crazy about that little Pokemon character. I said no, because I hate my nephew… I am joking of course, I adore him and I was really excited to make something for that little cutie pie.

I looked for free patterns online until I found one that I really liked. It is a tutorial by Sabrina which she published for free on her blog, Sabrina’s Crochet.  It is really easy to make,  and it took only a few days of my time to finish it. I didn’t follow the pattern to the letter, I made some modification to my liking like changing the numbers of rows, partly because I used a different brand of yarn and hook (I used Red Heart Super Savers and a 2.75mm hook).

IMG_6118

It ended up being about 12 inch tall, and I think it turned out really cute. The pattern was easy to follow, I added some augmentations at the bottom of the body to simulate the legs. I also used a different technique to make the feet just because I like to change things around when I use other people’s patterns, put my own touch!

IMG_6123

I really liked the way she made the tail, I thought it would be the hardest part but it turned out to be very easy. I didn’t use yarn to make the stripes, or the cheeks. I cut pieces of dark brown felt that I glued on the back of the body, and red circles that I glued on the face.

IMG_6122

The tail is a bit heavy, so I put some glue on the bottom instead of sewing, which allows it to stand up. (about 1.5 inches, all the way up to the first stripe).

My nephew really enjoyed his new toy, and I can’t think of anything better but the smile of a child when you give him something you made with love.

Happy crocheting!

Newborn little outfits

Recently, a friend of mine asked me if I could make two little outfits for a newborn’s photoshoot; a bear beanie with a diaper cover, and a caterpillar cocoon. I am not familiar with baby sizes and clothes, so I looked online for patterns to help me figure it out. After looking through many tutorials, I found one on youtube to make the hat and cocoon, and two different ones on Ravelry to make the bear hat, and diaper cover.

outfits_montage

I started with the diaper cover with a pattern by Casey Braden on Ravelry. I like her pattern because it is very easy to follow. I put two buttons on the front lap instead of one, I thought it would be easier to fasten them up, or readjust if needed.

IMG_6198

The pom-pom wasn’t part of that pattern, I found a youtube tutorial by GiddyUpWorkshop to make small ones. It teaches you how to make a pom-pom with a fork, I had so much fun I wanted to keep making more!

IMG_6199

Once I finished the diaper cover, I picked another pattern from Ravelry to make the bear hat. It is a tutorial by Amanda Kuhn  that includes a bow if the hat is for a girl. I just love its design, my little hat turned out so cute.

bearhat

The next outfit, a caterpillar cocoon and hat, was made using a youtube tutorial created by Nadia, YARNutopia. I used the same yarn she used for the cocoon, Red Heart Super Saver in green tones. The different shades of green are so pretty!

cocoon

I used a darker shade of red to make the hat. I did like the brighter version but I didn’t have it in stock. I just picked a lighter shade of purple to make the nose and the antennas to balance it out.

caterhat

I think these outfits are a great ideas for a newborn photo session, they do not take long to make. You can also choose to just make the hats for baby to wear when it is cold outside.

2hats

I cannot wait to see the photos of the baby with these little outfits, they are so cute! I I do get them, I will post them on my blog.

Happy crocheting!