Little Vampire Bat – Free Halloween Pattern

Here is another Halloween pattern, a little vampire bat!  Easy and perfect for beginners, it doesn’t take long to make, but is still very cute!

Halloween_Bat
Halloween Bat by MissDolkapots

You will need:
– Worsted 4/medium black, or charcoal yarn
– 2.75mm crochet hook
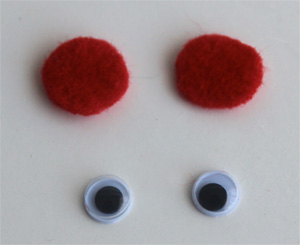
– Felt, black, red and white
– *Goggly eyes
– glue gun, or fabric glue
– Fiberfill for stuffing
– Yarn needle

Abbreviations:
– Rnd = rnd
– sc = single crochet
– inc = increase
– dec = decrease
– st = stitch

The Pattern:

Body:
With black or charcoal yarn, make a magic ring
Rnd 1: 6 sc in center of the ring (6)
Rnd 2:  2 sc in each st around (12)
Rnd 3:  [1 sc, inc] 6 times (18)
Rnd 4:  [2 sc, inc] 6 times (24)
Rnd 5:  [3 sc, inc] 6 times (30)
rnd 6 to 8:  1 sc in each st around (30)
Rnd 9:  [3 sc, dec] 6 times (24)
Rnd 10:  [2 sc, dec] 6 times (18)
Start stuffing and continue as you go
Rnd 11:  [1 sc, dec] 6 times (12)
Rnd 12:  dec 6 times around (6)
Fasten off, embroider yarn in rest of the stitches to close the hole.

– Cut 2 circles in red felt, and glue on the body. Glue the goggly eyes on the felt.

IMG_2385

– Cut 2 triangles in black felt to make the ears. Fold and glue the bottom extremity together. Glue to the ears to the head.

Bat_Ears

– Cut the pieces of black felt and shape them as bat wings. Glue the extremities to the back of the bat.

bat wings

– Cut 2 triangles with white felt and glue them at mouth level. These teeth are sharp! 😛

Bat-Amigurumi

Voila! Quick and easy, your cute Halloween bat is done! You can use a piece of yarn or embroidery thread to hang it. You can make several bats of different colors, have fun with the eyes, you can use bigger goggly eyes, even put one big and one small etc…

I hope you enjoyed this pattern as much as I enjoyed creating it!

Other Halloween projects on this blog:
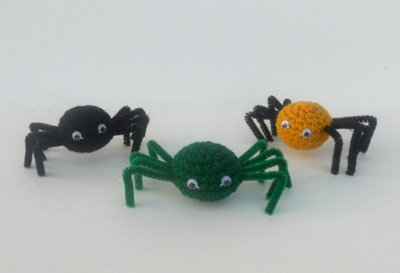
– Big Spider tutorial
– Small Spiders Tutorial

Happy crocheting!

* goggly eyes are small parts and therefore not suited for small children, in that case you can use felt instead.

The Big Spider Pattern

Last time I made a pattern to make little itsy bitsy spiders. Well, here comes the mama!  This one is also easy to make, the concept is the same as the little ones, but a little more sophisticated. It’s about 4.5 inch in length (around 12 cm), it doesn’t take long to make it, and if you’re not afraid of spiders, you won’t have any problems with it.  😉

Big (not so) scary spider by Miss Dolkapots

You will need:
– Worsted 4/medium orange yarn
– 2.75mm crochet hook
– Felt
– 12mm brown safety eyes (you can use goggly eyes too)
– Black chenille stems
– Fiberfill for stuffing
– Yarn needle

Abbreviations:
Rnd = rnd
sc = single crochet
inc = increase
dec = decrease
hdc = half double crochet
dc = double crochet

The pattern:

head/body:
With orange yarn, make a magic ring
Rnd 1: 6 sc in center of the ring (6)
Rnd 2: 2 sc in each st around (12)
Rnd 3: [1 sc, inc] 6 times (18)
Rnd 4: [2 sc, inc] 6 times (24)
Rnd 5 to 8: sc in each st around (24)
– at this point, insert the eyes if you use the safety ones.
Rnd 9: [2 sc, dec] 6 times (18)
Rnd 10: [1 sc, dec]6 times (12)
– Hold. Take 4 pieces of chenille stems (do not cut them), 2 for each sides. Insert them in the stitches, on the side of the head and fold them in two. (See itsy bitsy tutorial for pictures, it’s the same concept)
– Start stuffing, resume with the crochet:
Rnd 11: [2 sc, dec] 3 times (9)
Rnd 12: [2 sc, inc] 3 times (12)
Rnd 13: [1 sc, inc] 6 times (18)
Rnd 14: [2 sc, inc] 6 times (24)
Rnd 15 to 19: sc in each st around (24)
Rnd 20: [2 sc, dec] 6 times (18)
Rnd 21: sc in each st around (18)
Rnd 22: [1 sc, dec] 6 times (12)
– Finish stuffing
Rnd 22: dec 6 times (6)
Fasten off, embroider the remaining thread into the rest of the stitches to close the hole.

Fangs (make 2):
With orange felt,
Rnd 1: 4 in chain, 1 sc, 1 hdc, 1 dc
Fasten off and embroider to the head, below the eyes.

Cut a piece of felt in the shape of a moon, and glue it on the body.

Spider_Crochet

Voila! you’re spider is done. I hope you enjoyed this tutorial, and if you have any questions, don’t hesitate to ask me!

Happy crocheting!

Little Itsy Bitsy Spider Pattern

Halloween is just around the corner, and you don’t need to be super crafty to create really cute things to decorate for that time of the year. Here is a crochet tutorial to make some really cute little spiders to crawl all over your house!   It’s very simple, very easy, and you can make a bunch of them in no time. The kids will love them!

Halloween Spider Tutorial by MissDolkapots

What you will need:
–  4 medium worst yarn  (color of your choice)
– 2.75mm crochet hook
– goggly eyes
– chenille stems
– fiberfill for stuffing
– yarn needle
– safety pin to mark end of each row
– glue

abbreviations:
Rnd = rnd
sc = single crochet
inc = increase
dec = decrease

With yarn of your choice, 2 in chain
Rnd 1: 6 sc in second stitch from hook (6)
Rnd 2: 2 sc in each st around (12)
Rnd 3: [1 sc, inc] 6 times (18)
Rnd 4: [2 sc, inc] 6 times (24)
Rnd 5 to 7: sc in each st around (24)
Cut 4 pieces of chenille stem, about 5 inch long. Insert them in the stitches of the last row on each side, then fold them in two.

Insert the stem, then fold it

Resume with your rounds
Rnd 8: [2 sc, dec] 6 times (18)
Rnd 9: [1 sc, dec] 6 times (12)
Start stuffing
Rnd 10: dec  6 times (6)
Fasten off, weave the rest of the thread into the remaining stitches to close the hole.

Glue the *goggly eyes on the face. Bend the legs to form the shape of the legs.

Stem is folded in two to give shape to the legs.
Stem is folded in two to give shape to the legs

Your spider is done! You can have a lot of fun with this: play with different colors, add eyebrows, or a mouth. You can also Insert a piece of embroidery thread on top to hang you spiders.

You can hang them with embroidery thread anywhere you want

I hope you enjoyed this tutorial! Happy crocheting!

*Technically, goggly eyes are adhesive and should not need glue , but it doesn’t hold very well without extra glue.