Mushroom keychain pattern

I don’t know about you, but I love mushrooms! In omelettes, salads, and pies… When I don’t eat them, I like to make them with my hook and yarn. They don’t end up in my plate, but they make very cute decorative items such as ornaments, and keychains.

IMG_6066

Today I am sharing my pattern to make cute little ones. For this project you will need:
– scraps of beige and red yarn (or colors of your choice)
– light brown and off white felt
– fiberfill for stuffing
– glue gun, or fabric glue
– yarn needle

IMG_6064

The size of the mushroom is approximatively 3 inches, crocheted with a 2.75mm hook (the larger the size of the hook, the larger your mushroom will be).

IMG_6063

Abbreviations:
rnd = round
sc = single crochet
inc = increase
dec = decrease
blo = back loops only
flo = front loops only
ch = chain
tr = treble

PATTERN

Stem:
With beige yarn, make a magic ring
Rnd 1: 5 sc in the center of the ring (5)
Rnd 2: 2 sc in each st around (10)
Rnd 3: [1 sc, inc] 5 times (15)
Rnd 4: blo, sc in each st around (15)
Rnd 5: [5 sc, dec] 2 times, 1 sc (13)
Rnd 6: sc in each st around (13)
Optional: I put a little piece of cardboard at the bottom to keep it flat
Rnd 7: [4 sc, dec] 2 times, 1 sc (11)
Rnd 8 to 9: sc in each st around (11)
Rnd 10: [3 sc, dec] 2 times, 1 sc (9)
rnd 11 to 13: sc in each st around (9)
Rnd 14: ch 3, 2 tr in same st, 3 tr in each st around, join to first tr (26)
Fasten off, and stuff your stem with fiberfill. Cut a circle in a piece of light brown felt, a little smaller than the circumference of your last row. Glue it on your mushroom then resume your work.

IMG_6048

Cap:
With red yarn, make a magic ring
Rnd 1: 5 sc in the center of the ring (5)
Rnd 2: 2 sc in each st around (10)
Rnd 3: [1 sc, inc] 5 times (15)
Rnd 4: [2 sc, inc] 5 times (20)
Rnd 5: [3 sc, inc] 5 times (25)
Rnd 6: inc, 24 sc (26)
Rnd 7 to 8: sc in each st around (26)
Rnd 9: flo, sc in each st around (26)
Fasten off, and leave a long tail for sewing. Insert your remaining thread on the other side of the cap to start embroidering. Sew around using the stitches underneath the cap and front loops of the stem. You can add stuffing half way through the sewing, but don’t stuff too much or the bottom of the cap will not be flat. Fasten off, and hide your loose threads by embroidering them within stitches.


Voila! your mushroom is done. You can hook a chain to it, or a piece of yarn if you just want to turn it into an ornament. I hope you enjoyed this pattern, and if you have any questions, don’t hesitate to ask me in the comments section of this page.

IMG_6061

Happy Crocheting!

Hamburger pattern

Who doesn’t like burgers? Here is a free pattern to make a calorie free, cholesterol free, gluten free hamburger. Technically, it is also a vegetarian sandwich since the meat is fake! I used Red Heart Super Saver yarn to make this amigurumi, but you can use any yarn you like to make this project.

amigurumi hamburger

This burger is about 2 x 2.5 inches, can be used as an decorative ornament, keychain or a food toy for a little girl’s kitchen set.

crochet burger

I used mine to decorate my purse, it looks really cute as a side ornament.

DSCN9135

For this perfect food substitute you will need:

Materials:
– Yarn in beige, brown, yellow, and Camel (light brown)
– 2.75mm hook
– Felt, red and green
– Fiberfill for stuffing
– Stitch marker
– Yarn needle
– Glue gun

Abbreviations:
rnd = round
sc = single crochet
inc = increase
dec = decrease
ch = chain

Note:
This amigurumi is crocheted in continuous spirals without joining the rounds.

BURGER PATTERN

Top bun
– With light brown yarn
Rnd 1: make a chain with 2 stitches, 6 sc in second stitch from chain (6)
Rnd 2: 2 sc in each st around (12)
Rnd 3: [1 sc, inc] 6 times (18)
Rnd 4: [2 sc, inc] 6 times (24)
Rnd 5 to 6: sc in each st around (24)
– Fasten off

Bottom Bun
– With light brown yarn
Rnd 1: make a chain with 2 stitches, 6 sc in second stitch from chain (6)
Rnd 2: 2 sc in each st around (12)
Rnd 3: [1 sc, inc] 6 times (18)
Rnd 4: [2 sc, inc] 6 times (24)
Rnd 5: sc in each st around (24)

crochet buns

Bottoms of buns (make 2)
– With beige yarn
Rnd 1: make a chain with 2 stitches, 6 sc in second stitch from chain (6)
Rnd 2: 2 sc in each st around (12)
Rnd 3: [1 sc, inc] 6 times (18)
Rnd 4: [2 sc, inc] 6 times (24)
Fasten off, and leave a long tail for sewing.

bottom of burger buns

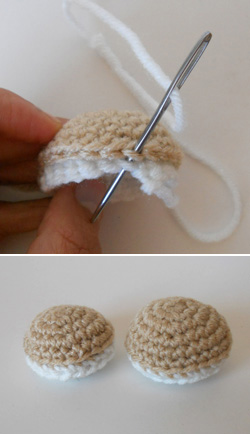
Start sewing the bottoms with the buns using the front stitch of the bun and back stitch of the bottom only to embroider the two pieces together. half way through sewing start stuffing with fiberfill. Do not stuff too much, you want the bottom to remain flat. Weave in the remaining threads into the stitches of the bun.

sewing the buns

Burger:
– With brown yarn
Rnd 1: make a chain with 2 stitches, 6 sc in second stitch from chain (6)
Rnd 2: 2 sc in each st around (12)
Rnd 3: [1 sc, inc] 6 times (18)
Rnd 4: [2 sc, inc] 6 times (24)
Fasten off, and embroider the remaining thread into the stitches.

Cheese:
– With yellow yarn, 10 in ch
Row 1: sc in second st from hook, 8 sc (9)
Row 2 to 8: ch 1, 9 sc (9)
Fasten off, and embroider the remaining thread into the stitches.

Cut two round shapes in red felt, and three leaves in green felt (tomatoes and lettuce).

Crochet burger tutorial

Glue the burger on the bottom of the bun with a glue gun, or fabric glue, followed by the cheese, tomatoes and leaves. Glue the top of the bun on the stack (do not put glue too close to the edge of the bun), press firmly.

Voila! the perfect calorie free hamburger! I hope you enjoyed this pattern and if you have any questions, don’t hesitate to ask me in the comments section.

Happy crocheting!

Calorie Free Pumpkin Pie “Recipe”

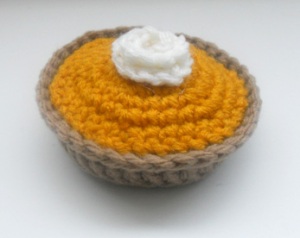
It’s almost Thanksgiving, turkey, stuffing and gravy, mash potatoes, cranberry sauce, and pies!  This is the time of the year when we forget about our diets, and just enjoy food until new year commitments. Here is an alternative that will distract you from guilty cravings, a non-edible pumpkin pie! As usual, this pattern is easy to make, a cute decoration for Thanksgiving, and it will take you less time than to bake a real one.

Amigurumi Pumpkin Pie

You will need:
– light brown, orange, and white/off white yarn of your choice
– 4mm hook
– fiberfill stuffing
– cardboard
– stitch marker (like a safety pin, to mark the end of each row)
– glue gun

Abbreviations:
– rnd = rnd
– sc = single crochet
– dc = double crochet
– inc = increase
– dec = decrease
– st = stitch
– ch = chain

Note: the rounds are worked in spiral, do not join the rows (except for rnd 7 and 8 of crust)

Crust:
With light brown yarn, make a magic ring
Rnd 1: 6 sc in center of the ring (6)
Rnd 2: 2 sc in each st around (12)
Rnd 3: [1 sc, inc] 6 times (18)
Rnd 4: [2 sc, inc] 6 times (24)
Rnd 5: [3 sc, inc] 6 times (30)
Rnd 6: [4 sc, inc] 6 times (36)
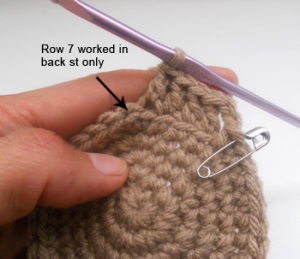
Rnd 7: chain 2, dc in each st around, back st only, join to first st (36)
Rnd 8: chain 1, sc in each st around, front st only. (36)
Join to first st, fasten off, and weave the loose ends into the stitches

Bottom of the pie
Bottom of the pie
The side of the crust
Last row of the crust

– Cut a piece of cardboard, or thick paper in the shape of a circle, and glue it at the bottom of the crust. This will keep it flat when you start stuffing.

Glue a piece of cardboard at bottom

Pumpkin filling:
With orange yarn, make a magic ring
Rnd 1: 6 sc in center of the ring (6)
Rnd 2: 2 sc in each st around (12)
Rnd 3: [1 sc, inc] 6 times (18)
Rnd 4: [2 sc, inc] 6 times (24)
Rnd 5: [3 sc, inc] 6 times (30)
Rnd 6: [4 sc, inc] 6 times (36)
Fasten off, leave a long tail for sewing.

– Stuff the pie with fiberfill, then sew the top with the crust using the front stitches inside the crust to join the two parts together. You  can add some fiberfill along the way if you feel it needs more stuffing.

Sew the top and crust together

Whipped Cream:

With white yarn, ch 10
Rnd 1: 3 sc in each st on the chain
Fasten off, weave the loose ends into the stitches. The row should curl naturally, just use a bit of glue to keep it together, flatten it a bit with your fingers, and glue to the pie.

oh yum!
oh yum!

Voila! Your pumpkin pie is ready! You can apply the same pattern to make different kind of pies by changing the color of the top part, for instance make it cream color with red balls to simulate berries.

I hope you enjoy this pattern, and if you have any questions, please feel free to leave a comment.

Happy crocheting!

Beginner Level – Amigurumi apple

In this tutorial, you will learn how to make this crocheted apple, or amigurumi apple. Let me add that of all the apple patterns out there, only mine is certified organic! 😉

apple_finish

Materials:
– Red yarn/medium
– Brown yarn/medium
– Crochet hook size G/4mm
– Green felt
– Yarn Needle
(use a stitch marker – safety pin or piece of yarn – to place at the end of your rows)

Abbreviations:
sc = single crochet
st = stitch(es)
rep = repeat
inc = increase
dec = decrease

BALL:
Rnd 1:  make a chain with 2 stitches, 6 sc in second stitch from chain (6)
Rnd 2: 2 sc in each st around (12)
Rnd 3: 1 sc, 1 inc, rep 6 times (18)
Rnd 4: 2 sc, 1 inc, rep 6 times (24)
Rnd 5: 3 sc, 1 inc, rep 6 times (30)
Rnd 6 to 11: sc in each st around (30)
Rnd 12: 3 sc, 1 dec, rep 6 times (24)
Rnd 13: 2 sc, 1 dec, rep 6 times (18)  Start stuffing
Rnd 14: sc in each st around (18)
Rnd 15: 1 sc, 1 dec, rep 6 times (12) Finish stuffing
Rnd 16:  dec in each st around (6)

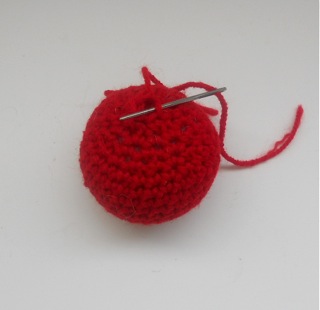
Fasten off, with a needle thread, weave in the 6 remaining stitches and pull tight to close. hide the remaining thread in the ball. (this side is the bottom of the apple)

apple_thread

Now, take a long piece of red yarn and needle, insert  it from the top of the apple to the bottom, weave it back to the top, pull both thread to make the bottom go inward, and make a tight knot.  Weave the yarn back into the bottom the same way, pull, and make a another knot. This will give your apple its shape.

apple_graphic

STEM – with brown yarn
Rnd 1:  make a chain with 7 stitches (make sure to leave a long thread)
Rnd 2:  6 slip st, fasten off.

Use the threads to attach the steam to the apple. weave the remaining yarn in the apple, and cut.

apple_stem

 Leaves:
Just take a piece of green felt, cut into leaves shapes, one big and one small.  Glue to the top with a glue gun, or fabric glue.

If you want to make this really fun, you can glue some goggly eyes and make a mouth with a yarn thread. This one was made with safety  eyes, which you would pin before finishing the ball.

apple_eyes

Hope you enjoyed this tutorial. Let me know if you find it useful, and if you have any questions about this tutorial, don’t hesitate to comment.

Happy crocheting!