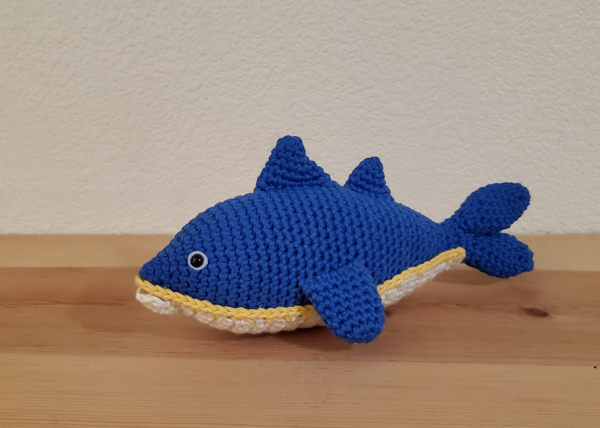
The fish I made that was inspired by Jin’s Super Tuna song is now available as a free pattern. It’s my Christmas gift to all of you for being so kind and supportive of my craft. I really enjoyed crocheting it and I hope that you will like it too. I tried to make my instructions very clear with lots of photos, but if you have any issues along the way please do not hesitate to ask me!
It has been too long since I posted a free pattern on this blog so I decided that today would be the day! I am going to share a very cute and easy tutorial to crochet a caterpillar. This little bug is very easier to make and perfect for beginners.
Without further ado, let’s begin!
CATERPILLAR PATTERN
MATERIALS:
– Medium/4 worsted yarn in the following colors: white, green, red, yellow, blue and black. (You can pick any colors you like, I just liked that combination.)
– 2.75mm hook
– Fiberfill for stuffing
– 12mm safety eyes (you can also use googly eyes)
– Yarn needle
– Ribbon
ABBREVIATIONS:
– ch = chain
– rnd = round
– sc = single crochet
– inc = increase
– dec = decrease
– beg = beginning
HEAD: With green yarn, make a magic ring
Rnd 1: 6 sc in center of the ring (6)
Rnd 2: 2 sc in each st around (12)
Rnd 3: [1 sc, inc] 6 times (18)
Rnd 4: [2 sc, inc] 6 times (24)
Rnd 5: [3 sc, inc] 6 times (30)
Rnd 6: sc in each st around (30)
Rnd 7: [6 sc, inc] 4 times, 2 sc (34)
Rnd 8 to 10: sc in each st around (34) Change yarn to white
Rnd 11: sc in each st around using back stitches only (34)
Rnd 12: [6 sc, dec] 4 times, 2 sc (30)
Rnd 13: sc in each st around (30)
Rnd 14: [3 sc, dec] 6 times (24)
Rnd 15: [2 sc, dec] 6 times (18)
Rnd 16: [1 sc, dec] 6 times (12)
Rnd 17: dec 6 times (6)
Fasten off and sew the remaining stitches together to close the hole: Insert your yarn needle in each front stitch and pull.
Note: Do not forget to stuff the head with fiberfill and insert the safety along the way.
BODY: With red yarn, make a magic ring
Rnd 1: 6 sc in center of the ring (6)
Rnd 2: 2 sc in each st around (12)
Rnd 3: [1 sc, inc] 6 times (18)
Rnd 4: [2 sc, inc] 6 times (24)
Rnd 5: [3 sc, inc] 6 times (30)
Rnd 6: [4 sc, inc] 6 times (36)
Rnd 7 to 11: sc in each st around (36)
Rnd 12: [4 sc, dec] 6 times (30)
Rnd 13: [3 sc, dec] 6 times (24) Start stuffing and continue along the way
Rnd 14: [2 sc, dec] 6 times (18)
Rnd 15: [1 sc, dec] 6 times (12) Change color to yellow
Repeat from rnd 3 to 15 three more times with different colors (if you want your caterpillar to be longer you can add more).
Decrease 6 times on the last row of the last ball just like the head.
ANTENNAS With black yarn , make a magic ring
Rnd 1: 6 sc in center of the ring (6)
Rnd 2: 2 sc in each st around (12)
Rnd 3: [1 sc, inc] 6 times (18)
Rnd 4: sc in each st around (18) Start stuffing with fiberfill and continue along the way
Rnd 5: [1 sc, dec] 6 times (12)
Rnd 6: dec 6 times (6) Change color to green
Rnd 7 to 11: sc in each st around (6)
Fasten off and sew on top of the head with the remaining threads.
LEGS (make 2 for each ball in the respective colors):
Leave a long tail at beg and end.
10 in ch.
Row 1: 9 sc.
Fasten off. Use the remaining threads of each leg to attach the legs on the
sides. Hide the extra threads into the body.
Voila! I hope you will enjoy this crochet pattern but if you run into difficulty or have any questions don’t hesitate to comment below. I usually answer really fast. Happy crocheting!
A friend of mine asked me if I could make a little bee to add to a baby blanket her grandmother crocheted, as well as a pair of baby booties to match the blanket. She wanted the bee to be three dimensional with a length of 4.5 inches, and the boots to be all black and yellow with a white top. I love to work with bees, and I love to work with different colors so I knew this would be a fun project!
The booties are based on a pattern by Sarah, from Repeat Crafter Me. I followed the same instructions for the shoes but changed colors along the way. The sole is all black, followed by 3 rows of yellow and 2 rows of black. From row 9 I changed the pattern with 2 rows of single crochet in yellow, 2 rows of single crochet in black, and one row of single crochet in white with 3 increase in front. I finished by I adding little Poms Poms for an extra dose of cuteness.
I came up with my own pattern to make the bee, which I wrote down on a piece of paper to share on my blog if anybody is interested. I used a 2.75mm hook, and basic acrylic worsted yarn (Red heart Super Savers) in white, yellow and black. The nose and eyes are made with felt, I had to use sharp small scissors to cut the pieces that small. I stuffed the bee with fiberfill, which can find at any craft store.
BEE PATTERN
Abbreviations:
Rnd: round
sc = single crochet
inc = increase
dec = decrease
st = stitch
sl st = slip stitch
hdc = half double crochet
dc = double crochet
ch = chain
beg = beginning
– Body: With black yarn, make a magic ring
Rnd 1: 5 sc in center of the ring (5)
Rnd 2: 1 sc in each st around (5)
Rnd 3: inc, 1 sc, inc, 1sc (7) Change color to yellow
Rnd 4: inc, 3 sc, inc, 2 sc (9)
Rnd 5: inc, 8 sc (10)
Rnd 6: [1 sc, inc] 5 times (15) Change color to black
Rnd 7: [2 sc, inc] 5 times (20)
Rnd 8: [3 sc, inc] 5 times (25) Change color to yellow
Rnd 9 to 10: sc in each st around (25) Change color to black
Rnd 11 to 12: sc in each st around (25) Change color to yellow. Start stuffing and continue along the way
Rnd 13 to 14: sc in each st around (25) Change color to black
Rnd 15 to 16: sc in each st around (25) Change color to yellow
Rnd 17 to 18: sc in each st around (25) Change color to black
Rnd 19: sc in each st around (25)
Rnd 20: [3 sc, dec] 5 times (20) Change to yellow
Rnd 21: [2 sc, dec] 5 times (15)
Rnd 22: [1 sc, dec] 5 times (10) Change to black
Rnd 23: inc each st around (20)
Rnd 24: [3 sc, inc] 5 times (25) Change to yellow
Rnd 25 to 27: sc in each st around (25)
Rnd 28: [3 sc, dec] 5 times (20)
Rnd 29: [2 sc, dec] 5 times (15)
Rnd 30: [1 sc, dec] 5 times (10)
Rnd 31: dec each st around (5) Fasten off, leave a long tail to embroider in the stitches to close the hole.
-Wings (make 4): With white yarn, 10 st in a chain
Rnd 1: 1 sc, 1 hdc, 5 dc, 1 hdc, 3 sc in last st, turn to the other side of the chain, 1 hdc, 5 dc, 1 hdc, 1 sc, sl st to beg of ch Fasten off, and embroider the remaining thread into the wing. Glue them on top of the body with a glue gun, or fabric glue.
– Antennas (make 2): With black yarn, 6 st in a chain
Row 1: [1 sc, 1 hdc, 1 sc] in second st from ch, 4 sl st Fasten off and leave a long tail to attach the antennas on top of the head with a double knot. Hide the remaining threads inside the head.
– Eyes and nose:
Cut 2 circles in white felt, and slightly smaller ones in black. Glue the white ones in front of the head, and the black ones slightly below. Cut a circle in red felt for the nose and glue it underneath the eyes.
Voila, your fly is ready to fly! I made this bee to add to a blanket, but it can also be used as a very cute ornament, or a toy. I hope you enjoy this pattern, and if you have any questions don’t hesitate to ask me in the comments.
It’s been a while since I blogged any patterns, so I thought I would post a tutorial today to make a cute little mouse. It is a very small little thing, about 4 inch tall, crocheted with a 2.75mm hook. I like to use small hooks to make stitches tighter. You can use a larger size hook if you wish, just know that your mouse will be bigger if you do.
The mouse is crocheted in continuous spirals without joining the rounds. I used a brush and eyemakeup to color the inside of the ears (optional).
Materials:
– 1 medium/4 worsted yarn – white
– Scraps of pink yarn
– 2.75mm crochet hook
– 1 pair of 6 mm safety eyes, black
– Polyester fiberfill for stuffing
– Stitch marker
– Yarn needle
– Pink ribbon
– Pink blush or eye make-up, and a small brush
Abbreviations:
ch = chain
st = stitch
sc = single crochet
inc = increase
dec = dec
sl st = slip stitch
rnd = round
PATTERN
HEAD: – With white yarn, start with a magic ring
Rnd 1: 5 sc in center of the ring (5)
Rnd 2: sc in each st around (5)
Rnd 3: 2 sc in each st around (10)
Rnd 4: [4 sc, inc] 2 times (12)
Rnd 5: [5 sc, inc] 2 times (14)
Rnd 6: [6 sc, inc] 2 times (16)
Rnd 7: [7 sc, inc] 2 times (18) – With pink yarn, embroider the nose on the tip. Secure with a double knot on the other side.
Rnd 8: [2 sc, inc] 6 times (24)
Rnd 9 to 10: sc in each st around (24) – Insert the eyes between row 8 and 9, about 8 stitches apart. Start stuffing, and continue along the way.
Rnd 11: [2 sc, dec] 6 times (18)
Rnd 12: [4 sc, dec] 3 times (15)
Rnd 13: [3 sc, dec] 3 times (12)
Rnd 14: dec 6 times (6) – Fasten off, embroider the thread in the remaining stitches to close the hole. Weave in loose end.
BODY: – With white yarn, start with a magic ring
Rnd 1: 5 sc in center of the ring (5)
Rnd 2: 2 sc in each st around (10)
Rnd 3: [1 sc, inc] 5 times (15)
Rnd 4: [2 sc, inc] 5 times (20)
Rnd 5: [3 sc, inc] 5 times (25)
Rnd 6 to 8: sc in each st around (25)
Rnd 9: [1 sc, dec] 5 times, 10 sc (20)
Rnd 10 to 11: sc in each st around (20)
Rnd 12: [2 sc, dec] 5 times (15) – Start stuffing the body
Rnd 13: sc in each st around (15)
Rnd 14: [1 sc, dec] 5 times (10)
– Fasten off. Leave a long tail for sewing. Finish stuffing the body. Pin the body with the head, then sew them together by embroidering in the stitches. Weave in the loose end.
LEGS (make 2): – With white yarn, start with a magic ring
Rnd 1: 5 sc in center of the ring (5)
Rnd 2: 2 sc in each st around (10)
Rnd 3: [3 sc, dec] 2 times (8)
Rnd 4: sc in each st around (8)
Rnd 5: [2 sc, dec] 2 times (6) – Fasten off, and leave a long tail for sewing. Stuff the legs, pin them to the body, and sew them by embroidering the stitches together. Weave in loose ends.
ARMS (make 2): – With white yarn, start with a magic ring
Rnd 1: 5 sc in center of the ring (5)
Rnd 2: 2 sc in each st around (10)
Rnd 3: [3 sc, dec] 2 times (8)
Rnd 4 to 6: sc in each st around (8)
Rnd 7: [2 sc, dec] 2 times (6) – Fasten off, and leave a long tail for sewing.
EARS (Make 2): – With white yarn, start with a magic ring
Rnd 1: 5 sc in center of the ring (5)
Rnd 2: 2 sc in each st around (10)
Rnd 3: [1 sc, inc] 5 times (15)
Rnd 4: [2 sc, inc] 5 times (20)
Rnd 5 to 6 : sc in each st around (20)
Rnd 7: [2 sc, dec] 5 times (15)
Rnd 8: [1 sc, dec] 5 times (10) – Fasten off, and leave a long tail for sewing.Do not stuff the ears, but flatten them into shape. With a small brush and some eye makeup (or blush), dab the inside of the ears in pink. Sew the ears to the side of the head, about 2 rows from the eyes.
TAIL: – With pink yarn, ch. 18 (leave a long tail at beginning)
Row 1: Starting at second ch from hook, make 16 sl st. – Insert one of the remaining thread into the stitches in the back of the body, and make a double knot. Hide the loose ends inside the body
You can have a lot of fun with this basic crochet pattern. I made a version with embroidered eyes, and I added a little hat and scarf for winter!
I hope you will enjoy this pattern, and if you have any questions don’t hesitate to ask me in the comments section of the page.
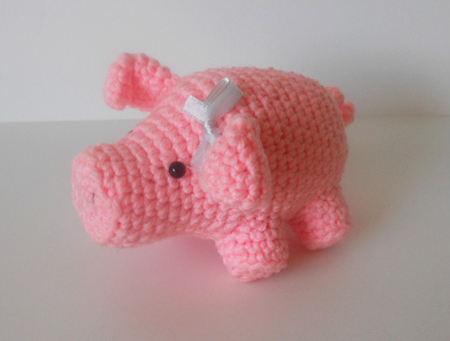
Oink! Oink! Here is a little pig right out of the yarn farm. He is very easy to make, anybody will fall for its cuteness! I had several requests for a pig pattern so today I am posting one to make you own Mr Piggy.
This plush is about 5 inch in length (13cm). I used Red Heart Super Saver in pink, and a 2.75mm hook. Here is the list of material you will need:
Materials:
– 1 medium/4 worsted yarn – pink
– 2.75mm hook
– 6mm safety eyes, black
– Polyester fiberfill for stuffing
– Yarn needle
– Embroidery thread, black
– Pins
– Ribbon of choice (I used grey)
– Stitch marker (to mark end of each row)
Abbreviations:
ch = chain
rnd = round
sc = single crochet
inc = increase
dec = decrease
st = stitch
sl st = slip stitch
BLO = back loop only
Note: This amigurumi is crocheted in continuous spirals without joining the rounds.
– THE PATTERN –
HEAD/BODY (start at nose): With pink yarn, make a magic ring
Rnd 1: 6 sc in center of the ring (6)
Rnd 2: 2 sc in each st around (12)
Rnd 3: [1 sc, inc] 6 times (18)
Rnd 4: sc in each st around, BLO (18)
Rnd 5 to 6: sc in each st around (18)
Rnd 7: [2 sc, inc] 2 times, 12 sc (20)
Rnd 8: sc in each st around (20)
Rnd 9: [3 sc, inc] 2 times, 12 sc (22)
Rnd 10: sc in each st around (22)
Rnd 11: [3 sc, inc] 3 times, 10 sc (25)
Rnd 12: [4 sc, inc] 5 times (30)
Rnd 13: [5 sc, inc] 5 times (35) – Insert safety eyes, between row 6 and 7, 7 sc apart.
Rnd 14 to 23: sc in each st around (35) – Start stuffing, and continue along the way.
Rnd 24: [5 sc, dec] 5 times (30)
Rnd 25: sc in each st around (30)
Rnd 26: [4 sc, dec] 5 times (25)
Rnd 27: [3 sc, dec] 5 times (20)
Rnd 28: [2 sc, dec] 5 times (15)
Rnd 29: [1 sc, dec] 5 times (10)
Rnd 30: dec 5 times (5) – Fasten off. Using a yarn needle, embroider the rest of the stitches together to close the hole. Hide the rest of the yarn in the body.
LEGS (make 4): With pink yarn, make a magic ring
Rnd 1: 6 sc in center of the ring (6)
Rnd 2: 2 sc in each st around (12)
Rnd 3: sc in each st around, BLO
Rnd 4 to 5 : sc in each st around (12) – Fasten off, leave a long tail for sewing. Stuff the legs with fiberfill, and sew them to the body. (I recommend that you pin all the legs before sewing to make sure they are placed properly).
EARS (make 2): With pink yarn, make a magic ring
Rnd 1: 4 sc in center of the ring (4)
Rnd 2: 2 sc in each st around (8)
Rnd 3: sc in each st around (8)
Rnd 4: [1 sc, inc] 4 times (12)
Rnd 5: 6 sl st, 6 sc (12)
Rnd 6 to 8: sc in each st around (12) – Fasten off, leave a long tail for sewing. Do not stuff the ears, leave them flat and bend them at row 5 level. Sew to each side of the head.
TAIL: With pink yarn, 14 in chain. Leave a long thread of yarn at beginning
Rnd 1: 13 sc – Use the threads to attach the tail to the body with a tight knot. Hide the remaining threads in the body.
Finishing touches:
– Use a piece of embroidery thread to make 2 stitches for the nose.
– Attach a little grey ribbon, or color of your choice by one of the ears.
Voila! Your cute little pig is done. I hope you enjoyed this pattern, and If you have any questions don’t hesitate to ask me in the comments section.
My friend’s son just turned one year old this week, and for his birthday I made him a crocheted security blanket to keep him company when he sleeps, a little teddy bear with a pilot hat and goggles.
I used a pattern I found online to make the blanket, but the bear is my own creation. I am sharing the tutorial on this post in case you are interested in making your own little bear pilot.
Let’s start with the blanket. I picked a pattern created by The Stitchin Mommy, called Crochet Lovey Bunny. This is a pattern to make a cute bunny security blanket, but since I had a teddy bear in mind I only used it for the base. The blanket is a simple granny square that is very easy to make, and looks very pretty. I skipped the last 2 rounds of the blanket because I didn’t want mine to be that wide.
To make the bear, you will need a 2.75mm hook if you want to end up with the same dimensions as mine. I also recommend to use the same kind of yarn for both blanket and bear. Let’s start with the head:
Bear’s Head: Make a magic ring
rnd 1: 6 sc in center of the ring (6)
rnd 2: 2 sc in each st around (12)
rnd 3: [1 sc, inc] x6 (18)
rnd 4: [2 sc, inc] x6 (24)
rnd 5: [3 sc, inc] x6 (30)
rnd 6: [4 sc, inc] x6 (36)
rnd 7: [5 sc, inc] x6 (42)
rnd 8: [6 sc, inc] x6 (48)
rnd 9 to 18: sc in each st around (48)
rnd 10: [6 sc, dec] x6 (42)
rnd 11: [5 sc, dec] x6 (36)
rnd 12: [4 sc, dec] x6 (30)
rnd 13: [3 sc, dec] x6 (24) Start stuffing and continue as you go
rnd 14: [2 sc, dec] x6 (18)
rnd 15: [1 sc, dec] x6 (12)
rnd 16: dec each st around (6) Fasten off, embroider loose thread into the stitches to close the hole.
The nose: Make a magic ring
rnd 1: 6 sc in center of the ring (6)
rnd 2: 2 sc in each st around (12)
rnd 3: [1 sc, inc] x6 (18)
rnd 4: [2 sc, inc] x6 (24)
rnd 5 to 6: sc in each st around (24) Fasten off and leave a long tail to sew the nose to the head. Stuff the nose a little bit while sewing. Embroider the snout with dark brown yarn
The Hat: Make a magic ring
rnd 1: 6 sc in center of the ring (6)
rnd 2: 2 sc in each st around (12)
rnd 3: [1 sc, inc] x6 (18)
rnd 4: [2 sc, inc] x6 (24)
rnd 5: [3 sc, inc] x6 (30)
rnd 6: [4 sc, inc] x6 (36)
rnd 7: [5 sc, inc] x6 (42)
rnd 8: [6 sc, inc] x6 (48)
rnd 9 to 10: sc in each st around (48) At this point you will work in rows instead of rounds
row 1: 26 sc, turn (26)
row 2 to 7: ch1, sc in each st around (26) At the end of row 7 continue to crochet sc all the way around the hat. Continue with the same thread to work on one of the sides:
ch 1, 4 sc, turn, make 6 rows of sc, fasten off. Attach your yarn on the other side and repeat the same process starting with ch 1.
Ears (make 2): Make a magic ring
rnd 1: 6 sc in center of the ring (6)
rnd 2: 2 sc in each st around (12)
rnd 3: [1 sc, inc] x6 (18)
rnd 4 to 5: sc in each st around (18) Fasten off, and leave a long tail for sewing.
Arms (make 2): Make a magic ring
rnd 1: 6 sc in center of the ring (6)
rnd 2: 2 sc in each st around (12)
rnd 3: [1 sc, inc] x6 (18)
rnd 4: [2 sc, inc] x6 (24)
rnd 5 to 6: sc in each st around (24)
rnd 7: [2 sc, dec] x6 (18)
rnd 8: sc in each st around (18)
rnd 9: [1 sc, dec] x6 (12)
rnd 10 to 14: sc in each st around (12)
rnd 15: dec, 10 sc (11)
rnd 16 to 18: sc in each st around (11)
rnd 19: dec, 9 sc (10)
rnd 20 to 22: sc in each st around (10) Fasten off, leave a long tail for sewing. Stuff the arm only half way through.
Goggles:
You will need brown and cream felt, and a glue gun. Cut two oval shapes in the brown felt, fold them and cut a hole in the middle. Cut two smaller oval shapes with cream felt and glue them on the brown felt. Cut a small rectangle with brown felt and glue it between the goggles. Cut a band with brown felt,long enough to go around the head, and glue it on both sides of the goggles.
Assembly:
Sew the hat to the head, then sew the ears on the top sides of the head. Glue the goggles to the hat, make sure that the band goes around the ears before proceeding. Sew the arms under each sides of the head.
You can sew the head to the blanket, but I prefer to glue it first for more sturdiness, then embroider with a piece of yarn thread for extra strength. I used a glue gun for that purpose, I think it works better than fabric glue.
About the scarf: I just made a chain of 4 stitches, then hdc every row until I was happy with the length.
I hope you enjoyed this tutorial, and if you have any questions don’t hesitate to ask me in the comments section.
It is Springtime and all the birds are back and chirping, so today I am posting a pattern to make cute little birdie to celebrate my favorite season of the year. This is a plush I actually made two years ago when I started writing my own patterns, but I do no longer have the little bird because my mum fell in love with it and took it home.
This is an easy project, but I took step by step pictures to make it even easier. I used a 2.75mm hook because I like tight stitches, but feel free to use a larger hook if you want your bird to be larger.
To make this birdie you will need:
– 1 medium/4 worsted yarn – yellow
– 1 medium/4 worsted yarn – orange
– 12mm safety eyes, black
– Felt, orange and yellow
– Ribbon of your choice
– Polyester fiberfill for stuffing
– Yarn needle
– Pins
– Glue gun, or fabric glue
– Stitch marker
Abbreviations:
ch = chain
st = stitch
sc = single crochet
inc = increase
dec = dec
rnd = round
Note: This amigurumi is crocheted in continuous spirals without joining the rounds. The finish size is about 5 inch in height.
THE PATTERN
HEAD: With yellow yarn, make a magic ring
Rnd 1: 6 sc in center of the ring (6)
Rnd 2: 2 sc in each st around (12)
Rnd 3: [1 sc, inc] 6 times (18)
Rnd 4: [2 sc, inc] 6 times (24)
Rnd 5: [3 sc, inc] 6 times (30)
Rnd 6: [4 sc, inc] 6 times (36)
Rnd 7: [5 sc, inc] 6 times (42)
Rnd 8 to 11: sc in each st around (42)
Rnd 12: [5 sc, dec] 6 times (36)
Rnd 13: [4 sc, dec] 6 times (30)
Rnd 14: [3 sc, dec] 6 times (24)
Rnd 15: [2 sc, dec] 6 times (18)
– At this point, cut a piece of felt in a shape of a heart, make holes for the eyes. Insert the safety eyes, and pin them to the head. Stuff firmly with fiberfill
The face with the heart shape felt and safety eyes.
– Glue the edges of the felt on the head with a glue gun, or fabric glue. You don’t need a lot of it, just a small film around the edge is enough.
Body: With yellow yarn, make a magic ring
Rnd 1: 6 sc in center of the ring (6)
Rnd 2: 2 sc in each st around (12)
Rnd 3: [1 sc, inc] 6 times (18)
Rnd 4: [2 sc, inc] 6 times (24)
Rnd 5: [3 sc, inc] 6 times (30)
Rnd 6: [4 sc, inc] 6 times (36)
Rnd 7 to 10: sc in each st around (36)
Rnd 11: [4 sc, dec] 6 times (30)
Rnd 12: [3 sc, dec] 6 times (24)
Rnd 13: [2 sc, dec] 6 times (18)
Rnd 14: [1 sc, dec] 6 times (12) Fasten off, and leave a long tail for sewing. Stuff the body with fiberfill, then sew to the head by embroidering the stitches together.
The shape of the body
Tail: With yellow yarn, make a magic ring
Rnd 1: 5 sc in center of the ring (5)
Rnd 2: 2 sc in each st around (10)
Rnd 3: sc in each st around (10)
Rnd 4: [1 sc, inc] 5 times (15)
Rnd 5: [2 sc, inc] 5 times (20)
Rnd 6: [3 sc, inc] 5 times (25)
Rnd 7: [4 sc, inc] 5 times (30) Fasten off, and leave long tail for sewing. Stuff the tail with fiberfill. Pin it with
needles on the back of the body, then sew it.
Shape of the tail. Sew it to the back of the bird.
Wings (make 2):
With yellow yarn, make a magic ring
Rnd 1: 6 sc in center of the ring (6)
Rnd 2: 2 sc in each st around (12)
Rnd 3: [1 sc, inc] 6 times (18)
Rnd 4 to 7: sc in each st around (18)
Rnd 8: [1 sc, dec] 6 times (12) Fasten off. Do not stuff the wings. Sew the wings to the body
Shape of the wings
Feet: With orange yarn,ch 4
Rnd 1: 3 sc, turn, 2 sc (5)
Rnd 2: 2 sc in each st around (10)
Rnd 3: [1 sc, inc] 5 times (15)
Rnd 4 to 5: sc in each st around (15)
Rnd 6: [1 sc, dec] 5 times (10)
Rnd 7 to 8: sc in each st around (10)
Rnd 9: dec 5 times (5) Fasten off, embroider the thread in the remaining stitches to close the hole. Do not stuff the feet, and glue them to the bottom of the body.
The shape of the feet. Only put glue half way through the back of the foot.
I used pins on the feet to check their position before gluing. The feet should be able to keep the body balanced.
Finishing touches:
– Cut a piece of ribbon of your choice, wrap it around the knot and make a bow.
– Cut a piece of yarn, and make a loop by inserting it in a stitch on top of the head. Yarn over thread, pull in loop and close tightly. Repeat with another piece of yarn, and cut the threads short.
How to make the hair of the bird.
Voila! Your little birdy is done! I hope you enjoyed this pattern, and as usual do not hesitate to comment if you have any questions or remarks.
Easter is coming! Here is a tutorial to make a really cute baby chick to decorate your house for Easter. This little bird is 3 inch tall and crocheted with a 2.75mm hook. You will need yellow, and off white/cream yarn to make this plush, and some orange felt. I used 6mm safety eyes, but you can also choose to just glue some black felt or embroider them with yarn.
MATERIALS:
– 1 medium/4 worsted yarn – off white or beige
– 1 Medium/4 worsted yarn – yellow
– 2.75mm crochet hook
– 1 pair of 6 mm safety eyes, black
– Polyester fiberfill for stuffing
– Stitch marker
– Yarn needle
– Orange felt, and some glue.
ABBREVIATIONS:
rnd = round
ch = chain
sc = single crochet
hdc = half double crochet
dc = double crochet
inc = increase
dec = dec
sl st = slip stitch
BABY CHICK PATTERN
CHICK: With yellow yarn, make a magic ring
Rnd 1: 6 sc in center of the ring (6)
Rnd 2: 2 sc in each st around (12)
Rnd 3: [1 sc, inc] 6 times (18)
Rnd 4: sc in each st around (18)
Rnd 5: [2 sc, inc] 6 times (24)
Rnd 6 to 14 : sc in each st around (24) Hold. Insert the eyes between row 10 and 11, about 7 stitches apart. Start stuffing, and continue along the way.
Rnd 15: [2 sc, dec] 6 times (18)
Rnd 16: sc in each st around (18)
Rnd 17: [1 sc, dec] 6 times (12)
Rnd 18: dec 6 times (6) Fasten off, cut the yarn and weave in the remaining thread in the stitches to close the hole.
WINGS (Make 2): With yellow yarn, make a magic ring
Rnd 1: 5 sc in center of the ring (5)
Rnd 2: 2 sc in each st around (10)
Rnd 3: [1 sc, inc] 5 times (15)
Rnd 4: [1 sc, dec] 5 times (10) Fasten off, flatten the wing, and leave a long tail for sewing. Sew both wings to the sides of the body at eye level, and weave in loose ends.
EGG, BOTTOM SHELL: With beige yarn, make a magic ring
Rnd 1: 6 sc in center of the ring (6)
Rnd 2: 2 sc in each st around (12)
Rnd 3: [1 sc, inc] 6 times (18)
Rnd 4: sc in each st around (18)
Rnd 5: [2 sc, inc] 6 times (24)
Rnd 6 to 8 : sc in each st around (24)
Rnd 9: *1 hdc, 1 dc, 1 hdc then 1 sl st in same st. Repeat from * 7 times (24) Fasten off, weave in loose ends.
EGG, TOP SHELL: With beige yarn, make a magic ring
Rnd 1: 6 sc in center of the ring (6)
Rnd 2: 2 sc in each st around (12)
Rnd 3: [1 sc, inc] 6 times (18)
Rnd 4: sc in each st around (18)
Rnd 5: [2 sc, inc] 6 times (24)
Rnd 6 to 7 : sc in each st around (24)
Rnd 9: *1 hdc, 1 dc, 1 hdc then 1 sl st in same st. Repeat from * 7 times (24) Fasten off, weave in loose ends.
Last row of egg shells: repeat the same pattern all the way around. You should end up with 8 curves.
Put the baby chick in the bottom shell, and the top shell on his head. Cut a triangle in orange felt and glue it between the eyes. Voila! your little baby chick is done.
I hope you enjoyed this pattern,and as usual, happy crocheting!
The year has just started and we are already half way through the month of January. I have so many projects, time slip through faster than I can crochet! One of my resolutions this year is to post more patterns on my blog, and since Valentine’s day is not too far away, I decided to start with this cute teddy bear you can make for your love or loved ones. (You can wrap it in a bag with candies or chocolates… Yum!)
– Note: this plush is worked in continuous spiral without joining the rounds. The final size of this teddy bear is 4 inch tall.
Materials:
– Brown yarn (I used Red Heart Super Saver – Cafe color)
– 2.75mm hook
– 6mm safety eyes, black
– Felt, red and copper brown
– Embroidery thread, brown
– Ribbon of your choice
– Fiberfill for stuffing
– Yarn needle
– Pins
– stitch marker (to mark the end of your row)
– Glue gun, or fabric glue
Abbreviations:
rnd = round
sc = single crochet
inc = increase
dec = decrease
st – stitch
PATTERN Head:
Rnd 1: make a chain with 2 stitches, 5 sc in second stitch from chain (5)
Rnd 2: 2 sc in each st around (10)
Rnd 3: [1 sc, inc] 5 times (15)
Rnd 4: [2 sc, inc] 5 times (20)
Rnd 5 to 9 : sc in each st around (20) – Insert the safety eyes, between row 7 and 8, about 5 st apart.
Rnd 10: [2 sc, dec] 5 times (15)
Rnd 11: [1 sc, dec] 5 times (10) – Fasten off, and stuff firmly with fiberfill.
Body:
Rnd 1: make a chain with 2 stitches, 5 sc in second stitch from chain (5)
Rnd 2: 2 sc in each st around (10)
Rnd 3: [1 sc, inc] 5 times (15)
Rnd 4: [2 sc, inc] 5 times (20)
Rnd 5 to 7: sc in each st around (20)
Rnd 8: [2 sc, dec] 5 times (15)
Rnd 9 to 11: sc in each st around (15)
Rnd 12: [1 sc, dec] 5 times (10)
Rnd 13: sc in each st around (10) – Fasten off, and leave a long tail for sewing. Stuff firmly with fiberfill.
Arms:(make 2)
Rnd 1: make a chain with 2 stitches, 5 sc in second stitch from chain (5)
Rnd 2: 2 sc in each st around (10)
Rnd 3: sc in each st around (10)
Rnd 4: [3 sc, dec] 2 times (8)
Rnd 5 to 6: sc in each st around (8)
Rnd 7: [2 sc, dec] 2 times (6) – Fasten off, and leave a long tail for sewing. Stuff half way through with fiberfill.
Legs:(make 2)
Rnd 1: make a chain with 2 stitches, 5 sc in second stitch from chain (5)
Rnd 2: 2 sc in each st around (10)
Rnd 3 to 4: sc in each st around (10)
Rnd 5: [3 sc, dec] 2 times (8) – Fasten off, and leave a long tail for sewing. Stuff firmly with fiberfill.
Ears:(make 2)
Rnd 1: make a chain with 2 stitches, 5 sc in second stitch from chain (5)
Rnd 2: [1 sc, inc] 2 times, 1 sc (7)
Rnd 3: sc in each st around (7) – Fasten off, and leave a long tail for sewing. Do not stuff.
Assembling:
Sew the body to the head, using the remaining thread from the body. Use the stitches of both parts to embroider them together. Sew the arms to the each side of the body, and ears to top sides of the head. For more details, you can check my tutorial How to Sew Parts Together.
For the legs, make sure you do not sew them to close to the bottom, or your bear will fall backward and won’t stand on his legs. I used pins first to make sure the legs are in the right position.
Nose:
Cut an oval in a piece of copper color felt, large enough to fit between the eyes. Embroider a noise with brown embroidery thread, then glue on the face.
Heart:
Cut a heart shape in a piece of red felt, glue to the front of the body. Tip: To make both side the same shape, cut a rectangle first, fold in two, and cut one side of the heart starting at the fold.
Cut a piece of ribbon and wrap it around the neck, make a bow.
Your little Valentine’s Day bear is done! I hope you enjoyed this pattern, and if you have any questions don’t hesitate to ask in the comments section.
I have been very busy making ornaments for the holidays season, Santas, snowmen, angels, penguins, elves etc… My house is filled with Christmas decorations and we are not even half way through November. One of the ornaments I made is a little dragonfly, a really cute little amigurumi that you can hang on your tree during the holidays season, or use as any kind of decoration.
I made mine beige and brown, but you can use any color you like. The size of the dragonfly is about 6 inch long, with a 2.75mm hook.
Materials:
– Medium/4 worsted yarn, brown and beige
– 2.75mm crochet hook
– Goggly eyes
– Fiberfill for stuffing
– yarn needle
– Glue gun, or fabric glue
– Embroidery thread, white
Abbreviations:
Rnd = round
sc = single crochet
inc = increase
dec= decrease
ch = chain
hdc = half double crochet
dc = double crochet
st = stitch
PATTERN: Body:
With beige yarn, make a magic ring
Rnd 1: 5 sc in center of the ring (5)
Rnd 2: 2 sc in each st around (10)
RNd 3: [1 sc, inc] 5 times (15)
Rnd 4 to 5: sc in each st around (15)
Rnd 6: [1 sc, dec] 5 times (10)
Rnd 7: [3 sc, dec] 2 times (8)
Rnd 8: [3 sc, inc] 2 times (10)
Rnd 9: [1 sc, inc] 5 times (15) – Start stuffing, and continue along the way
Rnd 10 to 12: sc in each st around (15)
Rnd 13: [5 sc, dec] 2 times, 1 sc (13)
Rnd 14: [4 sc, dec] 2 times, 1 sc (11)
Rnd 15: [3 sc, dec] 2 times, 1 sc (9)
Rnd 16 to 25: sc in each st around (9)
Rnd 26: 7 sc, dec (8)
Rnd 27: 6 sc, dec (7)
Rnd 28: 5 sc, dec (6)
Rnd 29: dec 3 times (3) Fasten off, and weave in the loose end in the last stitches of the tail.
Wings (make 4):
With brown yarn, 17 in ch.
Rnd 1: 2 sc, 2 hdc, 11 dc, 4 dc in last st, turn and continue on the other side of the chain, 11 dc, 2 hdc, 2 sc.
Fasten off, and weave in the loose ends.
Graphic version
– Glue the goggly eyes on the head, and the wings (2 on each side of the body)
– Cut a piece of embroidery thread, insert in the stitches on top of the dragonfly, and make a secure double knot. Move your thread until the knot is hidden inside the body.
I hope you enjoy this pattern, and if you have any questions, don’t hesitate to ask me.