Heart applique

Since we are coming close to Valentine’s day I decided to post a quick and easy tutorial for last minute Valentine’s day ideas. I am starting today with a heart applique that you can use for your crochet projects, or to follow the next two tutorials I am going to post in the next days. From heart applique to heart coasters, and from heart coaster to keychain. These will be really fun to make!

IMG_5174

This heart applique will take you no time at all. I was able to make 5 in half an hour time. For this you will need a G/4mm hook, and some regular 4/worsted yarn of your choice.

IMG_5184

Abbreviations:
sc = single crochet
hdc = half double crochet
dc = double crochet
sl st = slip stitch
tr = treble

Heart Pattern:
To start, make 2 st in a chain
Row 1: 2 sc in second stitch from hook (2)
ch 1, turn
Row 2: 2 sc in second stitch from hook, 2 sc in last stitch (4)
ch 1, turn
Row 3: 2 sc in second stitch from hook, 2 sc, 2 sc in last stitch (6)
ch 1, turn
Row 4: 2 sc in second stitch from hook, 4 sc, 2 sc in last stitch (8)
ch 1, turn
Row 5 to 6: sc in each stitch of the row (8)
ch 1, turn
Row 7: 3 sc, 2 sc in next stitch, 4 sc (9)
ch 1, turn
Row 8: 1 sc, 1 dc, 1 tr, 2 tr + 1 hdc in next stitch, 1 sl st, 1 hdc + 2 tr in next stitch, 1 tr, 1 dc, 1 sc (12)
Do not turn, continue to sc down the side. Make 1 sc, ch 1 and 1 sc in last st at the bottom, then continue to sc on the other side. Finish at the beginning or row 8 with a sl st (do not sc the top of the heart).

heartmontage

As easy as that, and so much fun. My next post will be to make a set of coasters with these appliques, perfect for a last minute Valentine’s day gift. Stay tune, and happy crocheting!

IMG_5189

IMG_5190

Elephant applique pattern

My last post was about the Elephant Tiramisu Blanket I made for a friend. Here is the pattern or the elephant applique, it’s very easy to make and I hope you will enjoy it!

Crochet elephant applique

I used a 4mm/G hook and Red heart Super Saver in grey and pink. Goggly eyes, and some glue. the head and ears of the elephant are crocheted in spiral without joining the rounds. The size of the applique is about 7 inch wide and 5 inch in length with the trunk. You can use a smaller crochet hook if you want a smaller applique.

Abbreviations:
rnd = round
inc = increase
dec = decrease
sc = single crochet
hdc = half double crochet
st = stitch

Head:
with grey yarn, make a magic ring
Rnd 1: 6 sc in center of the ring (6)
Rnd 2: 2 sc in each st around (12)
Rnd 3: [1 sc, inc] 6 times (18)
Rnd 4: [2 sc, inc] 6 times (24)
Rnd 5: [3 sc, inc] 6 times (30)
Rnd 6: [4 sc, inc] 6 times (36)
Rnd 7: [5 sc, inc] 6 times (42)
Fasten off, and weave in loose ends.

Trunk:
With grey yarn, 20 in ch (leave a long tail at beginning for sewing)
Rnd 1: 5 hdc, 2 hdc in same st, 5 hdc, 2 hdc in same st, 1 hdc, 5 dc (24)
Fasten off, weave in loose end and sew to the head at center.

DSCN8077

DSCN8078

Ears (Make 2):
With pink yarn, 10 in ch
Rnd 1: 8 sc, 3 in last st, turn and continue on the other side, 7 sc, 2 in last st (20)
Rnd 2: [3 sc, inc] 5 times (25)
Rnd 3: [4 sc, inc] 5 times (30)
Change yarn to grey, sl st to first st
Rnd 4: ch1, sc in same st and in each st around (30)
Fasten off, and leave a long tail for sewing. Weave in the thread to the side of the ear to use for sewing. Sew the head and ears together using only front loops of each part (about 7 stitches will be enough). Fasten off and weave in loose ends.

DSCN8079

Glue the goggly eyes, your elephant applique is done. (you can embroider the eyes if you prefer, or useblack felt like I did for the baby blanket.)

Voila! I hope you will find this tutorial useful. If you have any questions, don’t hesitate to ask me. Happy crocheting!


Airplane applique pattern

For the last month I have been working on a blanket for a friend’s baby shower, a pattern I found on Ravelry called Tiramisu Blanket. I wanted to add an applique, and it wasn’t difficult to figure out what to do since the nursery’s theme revolves around aviation and airplanes. Unfortunately, I couldn’t find any plane applique pattern, so I decided to make my own. I am sharing this pattern, hoping that you will like it!

Airplane applique pattern

All the parts are made separately, the body, wings, tails and helix. I used a G/4mm hook because I needed my airplane to be large, approx.  9 inch wide and 6 inch long. If you decide to work with 4mm, gauge will equal 2 inches for 9 stitches of single crochet. If you want your airplane smaller, just use a smaller hook.

I used Red Heart Super Saver Solids, you can pick any colors you want, whatever works best for your project. Now, to the pattern!

Abbreviations:
rnd = round
ch = chain
sc = single crochet
hdc = half double crochet
dc = double crochet
tr = treble
inc = increase
dec = decrease
st = stitch
sl st = slip stitch

Body:
With grey yarn, ch 20
Rnd 1: 18 sc, 3 sc in last st, continue on the other side of the chain, 18 sc, 2 sc in last st. (40 )
Rnd 2: 2 sc in next st, 9 sc, 8 hdc, 2 hdc in next 3 st, 8 hdc, 11 sc ( 44)
Rnd 3: 2 sc in next st, 8 sc, 4 hdc, 7 dc, 2 dc in next 5 st, 7 dc, 4 hdc, 8 sc (50)
– Fasten off, and weave in the loose ends.

plane crochet applique

Wings (make 2):
With blue yarn, ch 10
Rnd 1: 8 sc,3 sc in last st, continue on the other side of the chain, 7 sc, 2 sc in last st (20)
Rnd 2: 2 sc in next st, 7 sc, 2 sc in next 3 st, 9 sc (24)
Rnd 3: 2 sc, 2 sc in next st, 7 sc, 2 sc in next 5 st, 8 sc, 2 sc in last st (31)
Rnd 4: 2 sc, 2 sc in next st (32)
– Do not cut the yarn yet
sl st the wings to the back loops of the body, starting at the 7 st from top.Fasten off and weave in loose ends.

plane applique

plane applique

Tails (make 2):
– With blue yarn
– The tail will be crocheted in the back loops of the body. Insert your yarn in the 6th st from the back of the plane to make a loop. ch 3, tr in same st, 1 dc, 1 hdc, 1 sc, fasten off. Do the same of the other side. Weave in loose ends.

DSCN7446

plane applique pattern

Helix (make 2):With red yarn, 7 in ch
Row 1: 1 tr in 3rd st from hook, 1 dc, 1 hdc, 1 sc, 1 sl st.
– Fasten off, and leave a long tail to attach the helix in front of the plane. Make a knot in the back and weave in loose ends.

DSCN7449

Voila! I hope you found this tutorial useful, and if you have any questions or problems with the pattern, don’t hesitate to ask me.

Happy crocheting!

Easter fridgies, bunny and chick.

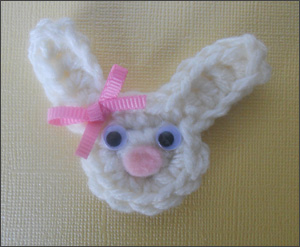
I thought it would be cute to make Easter fridge magnets, so I spent part of my time yesterday making a couple of fridgies: a bunny, and a little chick. Since they turned out really cute, I am sharing the patterns here, which are really easy and quick to make. You can turn them into brooch as well, you will only need a few materials listed below.

What you need:
Some white yarn, and yellow yarn
G/4mm hook
yarn needle
Glue gun
Wiggle eyes
Pink, and orange felt
Pink Ribbon
Magnet, or pin
(you can find magnets at any craft store. The one I bought comes in bands that you can cut with scissors)

Abbreviations:
rnd = round
ch = chain
sc = single crochet
hdc = half double crochet
dc = double crochet
st = stitch
sl st = slip stitch

WABBIT FRIDGIE PATTERN:
Bunny Fridgie Pattern
With white yarn, start with a magic ring
Rnd 1: 6 sc in center of the ring (6)
Rnd 2: 2 sc in each st around, sl st in next st to close the round (12)
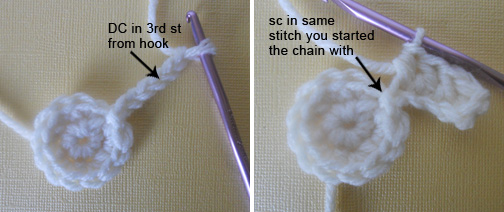
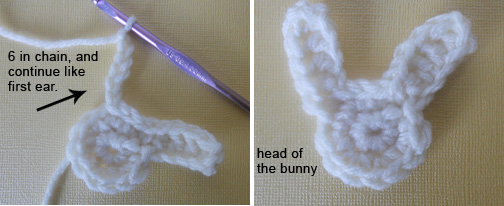
Rnd 3: ch. 6, dc in 3rd st. from hook, 2 dc, 1 hdc, sc in same st in round (stitch you started the chain with), 3 sl. st. then ch. 6, dc on 3rd st. from hook, 2 dc, 1 hdc, 1 sc, sl st in same st in round.
– Fasten off, weave in loose ends in back side.

– Cut a little circle, or oblong shape in some pink felt, and glue in the center for the nose. Glue wiggle eyes, then a little pink ribbon on one of the ears. Cut a piece of magnet, and glue it in the back (magnets are pre-glued but I like to add some with my glue gun to make sure it won’t come off)

Bunny fridgie tutorial

Bunny fridgie tutorial2


CHICK FRIDGIE PATTERN:
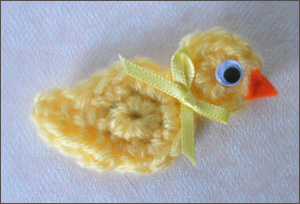
Easter Chick Fridgie
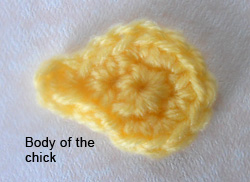
Body:
– with yellow yarn, start with a magic ring
Rnd 1: 6 sc in center of the ring (6)
Rnd 2: 2 sc in each st around (12)
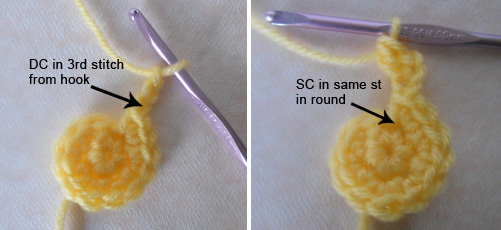
Rnd 3: ch. 3, dc in 3rd st from hook, sc in same st in round (stitch you started the chain with)
– Close the round with a sl st, fasten off. Weave in loose ends in back side.
Head:
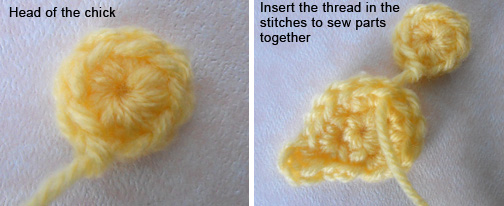
with yellow yarn, start with a magic ring
Rnd 1: 8 sc in center of the ring (8)
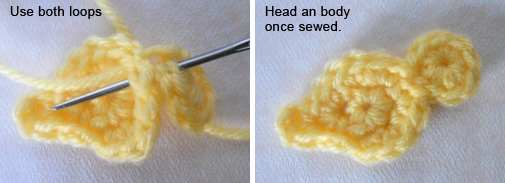
– Close the round with a sl st. Fasten off and leave a long tail for sewing. Weave loops of body and head to sew them together (about 3 loops). Weave in loose ends in back side.

– Cut a triangle in a piece of orange felt, and glue on the head to make a beak. Glue a googly eye in the center of the head. Glue a little yellow ribbon on the neck. Cut a piece of magnet, and glue it in the back.

Chick fridgie tutorial

chick fridgie tutorial2

Chick fridgie tutorial3

Voila! I hope you enjoyed this tutorial, and if you have any questions, dont’ hesitate to comment. Happy crocheting!


Shamrock pattern – St Patrick’s day freebie

It is almost time to celebrate St Patrick’s Day, and I thought it would be nice to share a pattern I came up with for a cute Shamrock that you can use to decorate for the occasion.

I hope you will enjoy this pattern, I have tried to make it as simple, and as easy to understand as I could with  help of photos. The shamrock is about 5 x 6 in. (12.5 x 15 cm).

Shamrock Crochet Pattern, by Miss Dolkapots

Abbreviations:
sc = single crochet
st = stitch
sl st = slip stitch
ch = chain

Leaves (make 4):
4 in chain. 
Row 1: sc in 2nd st from hook, and next 2 sc, turn
Row 2: ch.1, inc, 1 sc, inc, turn
Row 3: ch.1, 5 sc, turn
Row 4: ch.1, inc, 3 sc, inc, turn
Row 5 to 6: ch.1, 7 sc, turn
Row 7: ch.1, dec, 3 sc, dec, turn
Row 8: ch.1, dec, 1 sc, dec.
Fasten off, and weave in the remaining ends.

The 4 leaves of the shamrock

Assembling leaves together:
Row 1: With green yarn, make a loop at the base of one of the leaves, sc in same hole, then 2 more sc along the edge. Join another leave with a sc, then make 2 more sc. Continue with third and fourth leave. You should end with a row of 12 stitches.
Row 2: ch.1, dec 6 times, turn
Row 3: ch.1, dec 3 times, turn
Row 4: ch.1, dec, 1 sc, turn
Row 5 to 10: ch.1, 2 sc, turn
Rnd 11: ch.1, inc 2 times.
Do not fasten off

First leave: make a loop to start a row at base of leave, then 1 sc in same hole
Then 2 more sc along the edge
Second leave: sc into the next leave
then 2 more sc along the edge of second leave
Continue with the next 2 leaves. You end up with a row of 12 stitches
After decreasing on row 2, 3 and 4
Row 5 to 10, stem of the shamrock.

Edge:
Now that you have assembled the leaves together, continue with the same yarn and sc around the edge of the shamrock. sl st with the first st when you reach the end. Fasten off, and weave in the loose ends.

Finish your shamrock with sc around the edge.
sc around the edge to finish up the shamrock.

Voila! You can straighten your shamrock with pins and spray some starch on if you want to stiffen it, or you can leave it as it is. I hope you liked this pattern, and if you have any questions, please do not hesitate to comment!

Happy crocheting!

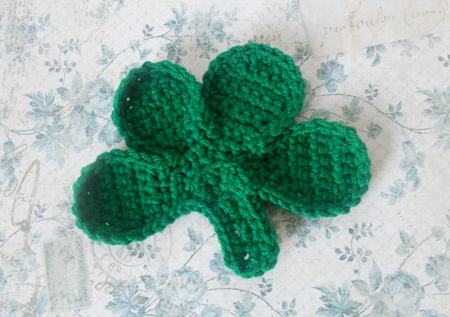
A cute shamrock to decorate for St Patrick's Day
A cute shamrock to decorate for St Patrick’s Day
I am using mine as a base for my crochet hooks pot holder.