Purple You plant Crochet Pattern

My little “Purple You” plant is not available as a crochet pattern on my ETSY Shop. You can make it in any color you want and write anything on the pin if you wish to add one! The pattern is very easy, you just need basic knowledge of crochet techniques such as single crochet, increase and decrease.

It’s a great gift for Valentine’s Day! I hope you will enjoy this pattern and if you have any questions don’t hesitate to ask me in the comments section.

Happy Crocheting!

From heart applique to coaster

Yesterday I published a pattern to make a heart applique, and today I am going to continue my Valentine’s day inspiration with a heart coaster pattern that will include the applique.

IMG_5207

This coaster, just like the heart is  very easy to make, and can be finish in no time. Tie them up with a ribbon to make a pretty presentation. This is a perfect project for last minute gift ideas for Valentine’s day or any occasions!

IMG_5226

Crocheted with a 4mm/G hook, the coaster is worked with half double crochet without joining the rounds. Use a stitch marker (I use a safety pin) to mark the end of your rows.

Abbreviations:
rnd= round
ch= chain
hdc= half double crochet
inc= increase
st = slip stitch
sl st = slip stitch

Coaster Pattern:
with color of your choice, make a magic ring
Rnd 1: 12 hdc in center of the ring (12)
Rnd 2: [1 hdc, inc next st] 6 times (18)
Rnd 3: [2 hdc, inc next st] 6 times (24)
Rnd 4: [2 hdc, inc next st] 6 times (30)
Rnd 5: [3 hdc, inc next st] 6 times (36)
Fasten off with a sl st. Using same color as your heart applique, make a loop in one of the stitches to start a new round.
Rnd 6: ch 1, sc in same st, sc in each st around (40)
Join with a sl st, and embroider the rest of your thread in the back of the stitches.

coastermontage

Now you can glue your heart on the coaster with a glue gun or fabric glue.(I prefer that to sewing this way it doesn’t leave ugly stitches in the back of the coaster).
I also like to flatten my coaster with a steamed iron. I cover the coaster in a towel and put the iron on top for a few seconds. (do not iron directly on the yarn).

IMG_5202

I hope you enjoyed this pattern, Monday I will post the last part of this series using the coaster and the applique to make a keychain.

Happy crocheting!

Heart applique

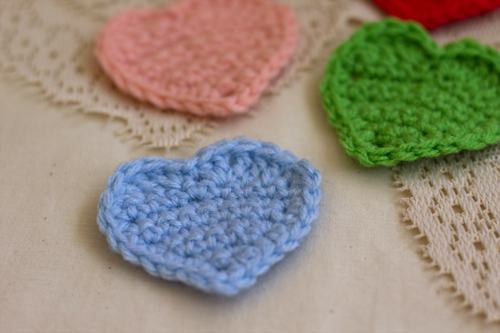
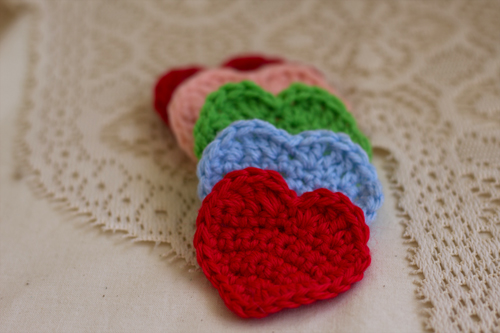
Since we are coming close to Valentine’s day I decided to post a quick and easy tutorial for last minute Valentine’s day ideas. I am starting today with a heart applique that you can use for your crochet projects, or to follow the next two tutorials I am going to post in the next days. From heart applique to heart coasters, and from heart coaster to keychain. These will be really fun to make!

IMG_5174

This heart applique will take you no time at all. I was able to make 5 in half an hour time. For this you will need a G/4mm hook, and some regular 4/worsted yarn of your choice.

IMG_5184

Abbreviations:
sc = single crochet
hdc = half double crochet
dc = double crochet
sl st = slip stitch
tr = treble

Heart Pattern:
To start, make 2 st in a chain
Row 1: 2 sc in second stitch from hook (2)
ch 1, turn
Row 2: 2 sc in second stitch from hook, 2 sc in last stitch (4)
ch 1, turn
Row 3: 2 sc in second stitch from hook, 2 sc, 2 sc in last stitch (6)
ch 1, turn
Row 4: 2 sc in second stitch from hook, 4 sc, 2 sc in last stitch (8)
ch 1, turn
Row 5 to 6: sc in each stitch of the row (8)
ch 1, turn
Row 7: 3 sc, 2 sc in next stitch, 4 sc (9)
ch 1, turn
Row 8: 1 sc, 1 dc, 1 tr, 2 tr + 1 hdc in next stitch, 1 sl st, 1 hdc + 2 tr in next stitch, 1 tr, 1 dc, 1 sc (12)
Do not turn, continue to sc down the side. Make 1 sc, ch 1 and 1 sc in last st at the bottom, then continue to sc on the other side. Finish at the beginning or row 8 with a sl st (do not sc the top of the heart).

heartmontage

As easy as that, and so much fun. My next post will be to make a set of coasters with these appliques, perfect for a last minute Valentine’s day gift. Stay tune, and happy crocheting!

IMG_5189

IMG_5190

Love Bunnies

Two years ago I made a pair of cute love bunnies using a pattern I found on Ravelry, and since Valentine’s day is just around the corner I thought this would be the perfect time to share the link to the page. It’s a free pattern designed by Erika Hughes, very easy to make and so darn cute!

Love Bunnies I made, pattern by Erika Hughes

The pattern is available as a PDF file, Erika Hughes Design- Love Bunnies Pattern.

Happy Crocheting!

Valentine’s Day teddy bear

The year has just started and we are already half way through the month of January. I have so many projects, time slip through faster than I can crochet! One of my resolutions this year is to post more patterns on my blog, and since Valentine’s day is not too far away, I decided to start with this cute teddy bear you can make for your love or loved ones. (You can wrap it in a bag with candies or chocolates… Yum!)

Valentine's day Teddy Bear

– Note: this plush is worked in continuous spiral without joining the rounds. The final size of this teddy bear is 4 inch tall.

teddy bear amigurumi

Materials:
– Brown yarn (I used Red Heart Super Saver – Cafe color)
– 2.75mm hook
– 6mm safety eyes, black
– Felt, red and copper brown
– Embroidery thread, brown
– Ribbon of your choice
– Fiberfill for stuffing
– Yarn needle
– Pins
– stitch marker (to mark the end of your row)
– Glue gun, or fabric glue

Abbreviations:
rnd = round
sc = single crochet
inc = increase
dec = decrease
st – stitch

PATTERN
Head:
Rnd 1: make a chain with 2 stitches, 5 sc in second stitch from chain (5)
Rnd 2: 2 sc in each st around (10)
Rnd 3: [1 sc, inc] 5 times (15)
Rnd 4: [2 sc, inc] 5 times (20)
Rnd 5 to 9 : sc in each st around (20)
– Insert the safety eyes, between row 7 and 8, about 5 st apart.
Rnd 10: [2 sc, dec] 5 times (15)
Rnd 11: [1 sc, dec] 5 times (10)
– Fasten off, and stuff firmly with fiberfill.

Body:
Rnd 1: make a chain with 2 stitches, 5 sc in second stitch from chain (5)
Rnd 2: 2 sc in each st around (10)
Rnd 3: [1 sc, inc] 5 times (15)
Rnd 4: [2 sc, inc] 5 times (20)
Rnd 5 to 7: sc in each st around (20)
Rnd 8: [2 sc, dec] 5 times (15)
Rnd 9 to 11: sc in each st around (15)
Rnd 12: [1 sc, dec] 5 times (10)
Rnd 13: sc in each st around (10)
– Fasten off, and leave a long tail for sewing. Stuff firmly with fiberfill.

Arms: (make 2)
Rnd 1: make a chain with 2 stitches, 5 sc in second stitch from chain (5)
Rnd 2: 2 sc in each st around (10)
Rnd 3: sc in each st around (10)
Rnd 4: [3 sc, dec] 2 times (8)
Rnd 5 to 6: sc in each st around (8)
Rnd 7: [2 sc, dec] 2 times (6)
– Fasten off, and leave a long tail for sewing. Stuff half way through with fiberfill.

Legs: (make 2)
Rnd 1: make a chain with 2 stitches, 5 sc in second stitch from chain (5)
Rnd 2: 2 sc in each st around (10)
Rnd 3 to 4: sc in each st around (10)
Rnd 5: [3 sc, dec] 2 times (8)
– Fasten off, and leave a long tail for sewing. Stuff firmly with fiberfill.

Ears: (make 2)
Rnd 1: make a chain with 2 stitches, 5 sc in second stitch from chain (5)
Rnd 2: [1 sc, inc] 2 times, 1 sc (7)
Rnd 3: sc in each st around (7)
– Fasten off, and leave a long tail for sewing. Do not stuff.

Assembling:
Sew the body to the head, using the remaining thread from the body. Use the stitches of both parts to embroider them together. Sew the arms to the each side of the body, and ears to top sides of the head. For more details, you can check my tutorial How to Sew Parts Together.

For the legs, make sure you do not sew them to close to the bottom, or your bear will fall backward and won’t stand on his legs. I used pins first to make sure the legs are in the right position.

Nose:
Cut an oval in a piece of copper color felt, large enough to fit between the eyes. Embroider a noise with brown embroidery thread, then glue on the face.

Heart:
Cut a heart shape in a piece of red felt, glue to the front of the body.
Tip: To make both side the same shape, cut a rectangle first, fold in two, and cut one side of the heart starting at the fold.

Cut a piece of ribbon and wrap it around the neck, make a bow.

amigurumi teddy bear

Your little Valentine’s Day bear is done! I hope you enjoyed this pattern, and if you have any questions don’t hesitate to ask in the comments section.

Happy crocheting!

Valentine’s day heart freebie

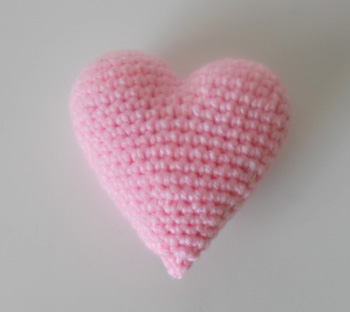
Last month I had published a post about  heart ornaments I had crocheted for a friend of mine. I had made a promise that I would publish the pattern on my blog by the time Valentine’s day would be just around the corner, so here it is, my Valentine’s Heart pattern. It is very easy and  as usual, doesn’t take long to make. Enjoy!

Amigurumi Heart - Valentine's day pattern
Amigurumi Heart – Valentine’s day freebie

The heart is about 3 1/2 inches. It is decorated with a ribbon and a rose, but it can be used as a base for any kind of decoration.

You will need:
– Pink yarn (I recommend Caron Simply Soft, or similar)
– 2.75mm hook
– Polyester fiberfill for stuffing
– Yarn needle
– Pink ribbon
– Fabric red rose (I found mine at JoAnn, it comes in a package with different colors)
– Glue gun, or fabric glue

abbreviations:
rnd = round
sc = single crochet
inc = increase
dec = decrease
st st = slip stich

THE PATTERN

Buns, (make 2):
With pink yarn or color of your choice, make a magic ring
Rnd 1: 5 sc in center of the ring (5)
Rnd 2: 2 sc in each st around (10)
Rnd 3: [1 sc, inc] 5 times (15)
Rnd 4: [2 sc, inc] 5 times (20)
Rnd 5: [3 sc, inc] 5 times (25)
Rnd 6 to 7: sc in each st around (25)
Do not cut the thread  from the yarn when you finish the second bun, you will slip stitch with the first bun.

The two buns for the heart

Body:
Attach the two buns together with 4 sl st. The row start at the next stitch.

buns_graph
Rnd 1: sc in each st around (42)
Put a stitch marker at last stitch to mark the end of the row.
Rnd 2: 7 sc, dec, 2 sc, dec, 14 sc, dec, 2 sc, dec, 9 sc (38)
Rnd 3: sc in each st around (38)
Rnd 4: 6 sc, dec, 2 sc, dec, 13 sc, dec, 2 sc, dec, 7 sc (34)
Rnd 5: sc in each st around (34)
Rnd 6: 6 sc, dec, 2 sc, dec, 11 sc, dec, 2 sc, dec, 5 sc (30)
Rnd 7: sc in each st around (30)
Rnd 8: 6 sc, dec, 1 sc, dec, 10 sc, dec, 1 sc, dec, 2 sc, dec (25)
Start stuffing, and continue along the way.
Rnd 9: [3 sc, dec] 5 times (20)
rnd 10: sc in each st around (20)
Rnd 11: [2 sc, dec] 5 times (15)
Rnd 12: sc in each st around (15)
Rnd 13: [1 sc, dec] 5 times (10)
Rnd 14: dec 5 times (5)
Fasten off, leave a long tail for sewing. With a yarn needle, close the hole by inserting the thread in the remaining stitches.

The heart
The naked heart

Decor:
– Option 1: Cut a piece of pink ribbon, make a bow and glue to the heart.
– Option 2: Insert the ribbon between to stitches of the heart using a yarn needle, then make the bow.
– Glue the flower on the ribbon.

valentine's day heart, by Miss Dolkapots
This is a very cute gift for your loved ones!

Voila! I hope you enjoyed this pattern, let me know if you have any questions, or if you like this pattern. My next post will be about different ideas to decorate a heart, using the same pattern.

Happy crocheting!