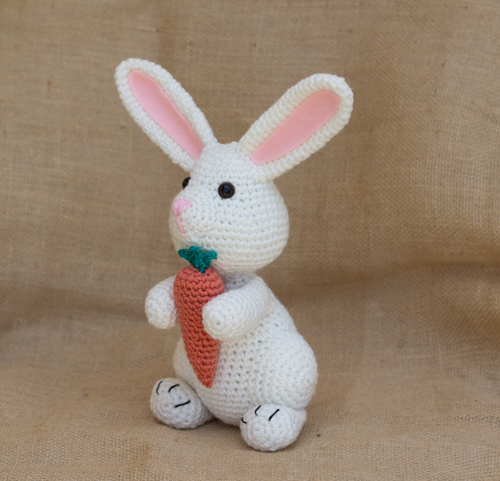
I just finished working on my latest crochet pattern which is now available on Etsy: a cute bunny rabbit and his favorite snack, a fresh and yummy carrot from the garden. He was inspired by another pattern I made a few months ago to crochet a squirrel holding an acorn. I am very happy with the result, It turned out exactly how I pictured it! Maybe I should turn it into a series of animals holding their favorite snacks!
He’s about 11 inches tall and crocheted with a 2.75mm hook. I used Red Heart Super Saver for the bunny and Caron Simply Soft for the carrot but using these specific brands is not mandatory. I picked an off-white color to crochet the bunny because pure white gets dirty too quickly.
This little bunny is easy to make. I like to keep my patterns simple by using basic stitches and techniques such as single crochet, increase and decrease. I also use a lot of descriptive photos to give help with visuals.
I Think I am going to take this bunny for a stroll in the garden and see if he will start hopping around or make friends with the real rabbits.
You can visit my Etsy shop If you are interested in this pattern or would like to see more pictures.
Easter is coming! Here is a tutorial to make a really cute baby chick to decorate your house for Easter. This little bird is 3 inch tall and crocheted with a 2.75mm hook. You will need yellow, and off white/cream yarn to make this plush, and some orange felt. I used 6mm safety eyes, but you can also choose to just glue some black felt or embroider them with yarn.
MATERIALS:
– 1 medium/4 worsted yarn – off white or beige
– 1 Medium/4 worsted yarn – yellow
– 2.75mm crochet hook
– 1 pair of 6 mm safety eyes, black
– Polyester fiberfill for stuffing
– Stitch marker
– Yarn needle
– Orange felt, and some glue.
ABBREVIATIONS:
rnd = round
ch = chain
sc = single crochet
hdc = half double crochet
dc = double crochet
inc = increase
dec = dec
sl st = slip stitch
BABY CHICK PATTERN
CHICK: With yellow yarn, make a magic ring
Rnd 1: 6 sc in center of the ring (6)
Rnd 2: 2 sc in each st around (12)
Rnd 3: [1 sc, inc] 6 times (18)
Rnd 4: sc in each st around (18)
Rnd 5: [2 sc, inc] 6 times (24)
Rnd 6 to 14 : sc in each st around (24) Hold. Insert the eyes between row 10 and 11, about 7 stitches apart. Start stuffing, and continue along the way.
Rnd 15: [2 sc, dec] 6 times (18)
Rnd 16: sc in each st around (18)
Rnd 17: [1 sc, dec] 6 times (12)
Rnd 18: dec 6 times (6) Fasten off, cut the yarn and weave in the remaining thread in the stitches to close the hole.
WINGS (Make 2): With yellow yarn, make a magic ring
Rnd 1: 5 sc in center of the ring (5)
Rnd 2: 2 sc in each st around (10)
Rnd 3: [1 sc, inc] 5 times (15)
Rnd 4: [1 sc, dec] 5 times (10) Fasten off, flatten the wing, and leave a long tail for sewing. Sew both wings to the sides of the body at eye level, and weave in loose ends.
EGG, BOTTOM SHELL: With beige yarn, make a magic ring
Rnd 1: 6 sc in center of the ring (6)
Rnd 2: 2 sc in each st around (12)
Rnd 3: [1 sc, inc] 6 times (18)
Rnd 4: sc in each st around (18)
Rnd 5: [2 sc, inc] 6 times (24)
Rnd 6 to 8 : sc in each st around (24)
Rnd 9: *1 hdc, 1 dc, 1 hdc then 1 sl st in same st. Repeat from * 7 times (24) Fasten off, weave in loose ends.
EGG, TOP SHELL: With beige yarn, make a magic ring
Rnd 1: 6 sc in center of the ring (6)
Rnd 2: 2 sc in each st around (12)
Rnd 3: [1 sc, inc] 6 times (18)
Rnd 4: sc in each st around (18)
Rnd 5: [2 sc, inc] 6 times (24)
Rnd 6 to 7 : sc in each st around (24)
Rnd 9: *1 hdc, 1 dc, 1 hdc then 1 sl st in same st. Repeat from * 7 times (24) Fasten off, weave in loose ends.
Last row of egg shells: repeat the same pattern all the way around. You should end up with 8 curves.
Put the baby chick in the bottom shell, and the top shell on his head. Cut a triangle in orange felt and glue it between the eyes. Voila! your little baby chick is done.
I hope you enjoyed this pattern,and as usual, happy crocheting!
I thought it would be cute to make Easter fridge magnets, so I spent part of my time yesterday making a couple of fridgies: a bunny, and a little chick. Since they turned out really cute, I am sharing the patterns here, which are really easy and quick to make. You can turn them into brooch as well, you will only need a few materials listed below.
What you need:
Some white yarn, and yellow yarn
G/4mm hook
yarn needle
Glue gun
Wiggle eyes
Pink, and orange felt
Pink Ribbon
Magnet, or pin (you can find magnets at any craft store. The one I bought comes in bands that you can cut with scissors)
Abbreviations:
rnd = round
ch = chain
sc = single crochet
hdc = half double crochet
dc = double crochet
st = stitch
sl st = slip stitch
WABBIT FRIDGIE PATTERN: With white yarn, start with a magic ring
Rnd 1: 6 sc in center of the ring (6)
Rnd 2: 2 sc in each st around, sl st in next st to close the round (12)
Rnd 3: ch. 6, dc in 3rd st. from hook, 2 dc, 1 hdc, sc in same st in round (stitch you started the chain with), 3 sl. st. then ch. 6, dc on 3rd st. from hook, 2 dc, 1 hdc, 1 sc, sl st in same st in round. – Fasten off, weave in loose ends in back side.
– Cut a little circle, or oblong shape in some pink felt, and glue in the center for the nose. Glue wiggle eyes, then a little pink ribbon on one of the ears. Cut a piece of magnet, and glue it in the back (magnets are pre-glued but I like to add some with my glue gun to make sure it won’t come off)
CHICK FRIDGIE PATTERN: Body: – with yellow yarn, start with a magic ring
Rnd 1: 6 sc in center of the ring (6)
Rnd 2: 2 sc in each st around (12)
Rnd 3: ch. 3, dc in 3rd st from hook, sc in same st in round (stitch you started the chain with) – Close the round with a sl st, fasten off. Weave in loose ends in back side. Head: with yellow yarn, start with a magic ring
Rnd 1: 8 sc in center of the ring (8) – Close the round with a sl st. Fasten off and leave a long tail for sewing. Weave loops of body and head to sew them together (about 3 loops). Weave in loose ends in back side.
– Cut a triangle in a piece of orange felt, and glue on the head to make a beak. Glue a googly eye in the center of the head. Glue a little yellow ribbon on the neck. Cut a piece of magnet, and glue it in the back.
Voila! I hope you enjoyed this tutorial, and if you have any questions, dont’ hesitate to comment. Happy crocheting!
Easter is a great source of inspiration when it comes to crafting, and lately I have been busy making Spring related items, such as flowers, bunnies etc… And I just finished a mama chicken and her baby chick.
I used raffia I found at the floral section of the craft store to make the nest.
Mama chicken is nesting.
I learned a lot about chickens while making these amigurumi. I learned that the top of the head of a chicken is called a comb, and that the part underneath the beak is called a wattle. Thanks to crafting, I expanded my knowledge in bird anatomy!
Last week I worked on a bunny, a cute white wabbit with pink feet and pink cheeks, and pink ribbon. I wanted to send something to my nephew, and since Easter is right around the corner I thought this would be a nice gift for the occasion as well.
Easter Bunny Pattern, by Miss Dolkapots
The bunny was made with Red Heart Super Saver yarn in off white, and pink. I put some blush on the cheeks, and inside the ears.
A bunny for Easter
I cannot wait to send this bunny to my nephew, in the meantime, happy crocheting!