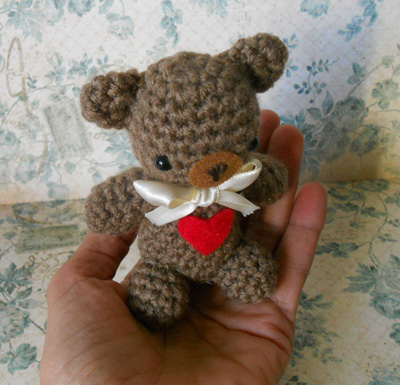
The year has just started and we are already half way through the month of January. I have so many projects, time slip through faster than I can crochet! One of my resolutions this year is to post more patterns on my blog, and since Valentine’s day is not too far away, I decided to start with this cute teddy bear you can make for your love or loved ones. (You can wrap it in a bag with candies or chocolates… Yum!)
– Note: this plush is worked in continuous spiral without joining the rounds. The final size of this teddy bear is 4 inch tall.
Materials:
– Brown yarn (I used Red Heart Super Saver – Cafe color)
– 2.75mm hook
– 6mm safety eyes, black
– Felt, red and copper brown
– Embroidery thread, brown
– Ribbon of your choice
– Fiberfill for stuffing
– Yarn needle
– Pins
– stitch marker (to mark the end of your row)
– Glue gun, or fabric glue
Abbreviations:
rnd = round
sc = single crochet
inc = increase
dec = decrease
st – stitch
PATTERN
Head:
Rnd 1: make a chain with 2 stitches, 5 sc in second stitch from chain (5)
Rnd 2: 2 sc in each st around (10)
Rnd 3: [1 sc, inc] 5 times (15)
Rnd 4: [2 sc, inc] 5 times (20)
Rnd 5 to 9 : sc in each st around (20)
– Insert the safety eyes, between row 7 and 8, about 5 st apart.
Rnd 10: [2 sc, dec] 5 times (15)
Rnd 11: [1 sc, dec] 5 times (10)
– Fasten off, and stuff firmly with fiberfill.
Body:
Rnd 1: make a chain with 2 stitches, 5 sc in second stitch from chain (5)
Rnd 2: 2 sc in each st around (10)
Rnd 3: [1 sc, inc] 5 times (15)
Rnd 4: [2 sc, inc] 5 times (20)
Rnd 5 to 7: sc in each st around (20)
Rnd 8: [2 sc, dec] 5 times (15)
Rnd 9 to 11: sc in each st around (15)
Rnd 12: [1 sc, dec] 5 times (10)
Rnd 13: sc in each st around (10)
– Fasten off, and leave a long tail for sewing. Stuff firmly with fiberfill.
Arms: (make 2)
Rnd 1: make a chain with 2 stitches, 5 sc in second stitch from chain (5)
Rnd 2: 2 sc in each st around (10)
Rnd 3: sc in each st around (10)
Rnd 4: [3 sc, dec] 2 times (8)
Rnd 5 to 6: sc in each st around (8)
Rnd 7: [2 sc, dec] 2 times (6)
– Fasten off, and leave a long tail for sewing. Stuff half way through with fiberfill.
Legs: (make 2)
Rnd 1: make a chain with 2 stitches, 5 sc in second stitch from chain (5)
Rnd 2: 2 sc in each st around (10)
Rnd 3 to 4: sc in each st around (10)
Rnd 5: [3 sc, dec] 2 times (8)
– Fasten off, and leave a long tail for sewing. Stuff firmly with fiberfill.
Ears: (make 2)
Rnd 1: make a chain with 2 stitches, 5 sc in second stitch from chain (5)
Rnd 2: [1 sc, inc] 2 times, 1 sc (7)
Rnd 3: sc in each st around (7)
– Fasten off, and leave a long tail for sewing. Do not stuff.
Assembling:
Sew the body to the head, using the remaining thread from the body. Use the stitches of both parts to embroider them together. Sew the arms to the each side of the body, and ears to top sides of the head. For more details, you can check my tutorial How to Sew Parts Together.
For the legs, make sure you do not sew them to close to the bottom, or your bear will fall backward and won’t stand on his legs. I used pins first to make sure the legs are in the right position.
Nose:
Cut an oval in a piece of copper color felt, large enough to fit between the eyes. Embroider a noise with brown embroidery thread, then glue on the face.
Heart:
Cut a heart shape in a piece of red felt, glue to the front of the body.
Tip: To make both side the same shape, cut a rectangle first, fold in two, and cut one side of the heart starting at the fold.
Cut a piece of ribbon and wrap it around the neck, make a bow.
Your little Valentine’s Day bear is done! I hope you enjoyed this pattern, and if you have any questions don’t hesitate to ask in the comments section.
Happy crocheting!


absolutely love, me and my sister inlaw just finished could you make a crochet vest pattern for the bear?
Oh I am glad you like the pattern. I have never designed clothing for my plushes, but I think I could come up with something. 🙂
Really! that’s awesome thank you. 🙂
This pattern is super cute!!!
I was just wondering, would I be allowed to sell any amigurumi made with this pattern if I make sure to credit you as well as provide a link to your site?
Thank you! Yes you can sell amigurumis made from this pattern, thank you for asking. 🙂
What do you mean by “decrease” as a stitch description/instruction?
Hi Cheryl, a decrease is to substract a stitch from the row. In crochet terms, it is also called “dec” or “sc2tog”. To make one decrease: Insert your hook into the stitch. Yarn over, and draw the yarn through the stitch. Insert your hook into the next stitch, Yarn over, and draw the yarn through the stitch. Yarn over, and draw the yarn through all 3 loops on your hook. I hope this helps! 🙂
how much yarn would this require?